Audio Playback for Streaming Online Performances (like Zoom)

TL;DR:
More and more acting companies are moving online to bring their performances to audiences, via Zoom and other streaming platforms. Here’s how to work with playback cues in this environment.

The Story:
At the time of writing this (April, 2020) a deadly pandemic has been sweeping the globe. In response to people all over the world staying home, business closing, and large gatherings being banned, theatre companies have started experimenting with virtual performances. Actors perform in front of webcams at home, and find novel ways to interact with their fellow cast across the internet who are locked up in their own homes. 

One of the earliest groups to rise to prominence doing this has been “The Show Must Go On(line)” – which has been ripping through Shakespeare’s plays, in order. Check them out at https://robmyles.co.uk/theshowmustgoonline/.

Virtual meeting platforms, like Zoom and WebEx, are moving from corporate boardrooms and laptops of tech savvy consumers to become part of the everyday language of quarantined populations. Zoom, in particular, has become a runaway hit, and the name has become a verb, much like Google did in the early ‘00s.

We are going to look at sound cue playback in this environment. And, of course, we’ll be using Qlab! For the streaming service, we will focus on Zoom for examples – but many of these features and settings are available on the other platforms as well.

NOTE: For this post, despite talking about sound, we are ignoring the obvious issue of actor mics. There are so many ways to go – built-in mic, webcam with built-in mic, USB mic, mics with an audio interface… It all comes down to budget, room sound/treatment, cast size, etc. It’s still early on in the shift to online, and standardizing hardware across an entire acting company can be a big budget line item. Is it a good idea to? Sure. But we are all just trying to find ways to make this work in the new reality…)

The Esoteric Bit:
We have a lot of ground to cover; here are the areas we will examine:

  1. End user audio
  2. Internet data and latency
  3. Latency measurements
  4. Soundcard setup
  5. Zoom audio settings
  6. Zoom connectivity options
  7. Qlab audio settings

END USER AUDIO
The first thing to understand is that we have very little control over the end user’s experience. In a venue with an audience, the sound designer and engineer can manipulate the audience’s experience, and can check what it sounds like from any seat of the house. 

Broadcasting over the internet, however, we have no idea what ends up happening to the sound once it leaves our network and hits the ’net. Audience members tuning in may be listening via headphones, ear buds, laptop speakers, a stereo system… anything. So they may not have a subwoofer to help them appreciate the depth charge sample that you’ve cleverly hidden in that cue in Scene 5 (I’ll come clean and admit this is the Wilhelm Scream of my designs…)

Furthermore, they might be connecting to the audio feed using their computer…OR THE PHONE. Many services allow you to dial in with a phone to listen in. Is it a landline? A cell phone? Each can sound different. Regardless, if they are using a phone connection, you can throw “stereo sound” right out the window. Telephones are in mono.

Within Zoom, we do have the option to restrict to computer audio and not offer phone connections. (People using their mobile device to tune in will be using the computer audio vs a phone connection.) So, taking this step will at least keep stereo audio preserved. Interestingly, the Computer Audio feed is also a higher quality than that of a telephone line (no specs available.).

Otherwise, accept that there is not much you can do about how people hear your sound cues. 

INTERNET DATA AND LATENCY
The other big issue we have to talk about when playing back audio over the internet is “latency.” Latency is something most sound engineers and designers are familiar with now in the digital age – live and in the studio. The addition of plugins and converters adds milliseconds of time into the signal chain, and depending on what you’re doing you have multiple ways of dealing with it. 

In our case, latency is the lag that happens between computers across the internet – and why musicians can not play live together over it. Everyone hears things at different times as data reaches their computer. 
Without earning a computer science degree, here is how data travels on the internet. The computer I am using here in Connecticut, USA, plays an audio cue online. Someone tuned into my stream in NYC will hear it – after those bytes of data have pinged, likely, through servers all over the East Coast, at a minimum. It has to travel from my computer, to the service’s server in, say, Durham, NC, then over to the viewer. But the way internet traffic moves, it is more complicated than this – that one sound cue might be broken up into multiple packets, and is scattershot across the internet, like a pile of letters in the post office taking different routes and being reassembled at the critical hubs. It sounds messy, and it is, but networks are incredibly efficient at moving data along, and it happens incredibly fast nowadays. 

LATENCY MEASUREMENTS
The upshot is that the testing I have done with Zoom (and getting similar results on WebEx) yields the following latency:

Test 1:
Audio computer, on wired LAN, sending cues to an audience computer, also on a wired LAN: 100-200ms of latency
(Note, these two computers were on the same network – that data had to leave my house, go to the Zoom servers, and come back to my network. So it doesn’t matter that they were sitting next to each other on the table.)

Test 2:
Audio computer, on wired LAN, sending cues to an audience smartphone, connected to a cellular network: 500ms of latency
(That’s half a second!)

Imagine now that you are trying to precisely time your cue against an actor’s words or action. That is a LOT of lag! Obviously, wired LAN is better than Wifi, so you are taking advantage of the fastest speed possible. Regardless, however, such latency may impact your performance and cueing, so you will need to take this into account and adjust accordingly.

There is nothing you can do about these numbers, other than keeping your own connection as healthy and fast as possible. This is just how the internet is put together. 

SOUNDCARD SETUP
Video conferencing software works like your cell phone – you don’t hear your own voice. (Which is why many people speak louder into a cell phone than into a landline.) So, let’s set up a sound card that Zoom will receive audio from, while also playing back locally. You don’t need a fancy audio interface. We will do this with what your Mac came with!

For many years, Macs often shipped with a free, open source, virtual soundcard called Soundflower, with 2- and 64-channel versions available. It allows applications to route audio between each other. Soundfower got sold, the company retired it, and now sells an application called Loopback. Therefore, Apple stopped shipping computers with it. But the good news is that it is still available, still free, and still works. You can download it here:

https://github.com/mattingalls/Soundflower/releases/tag/2.0b2

Install this, and then open up Audio Midi Setup on your computer. We are going to create an aggregate audio device, something that I wrote extensively about in a past blog post:

https://www.rocktzar.com/aggregate-audio-interfaces-osx-use-qlab-course/

Audio Midi settings for aggregate audio device

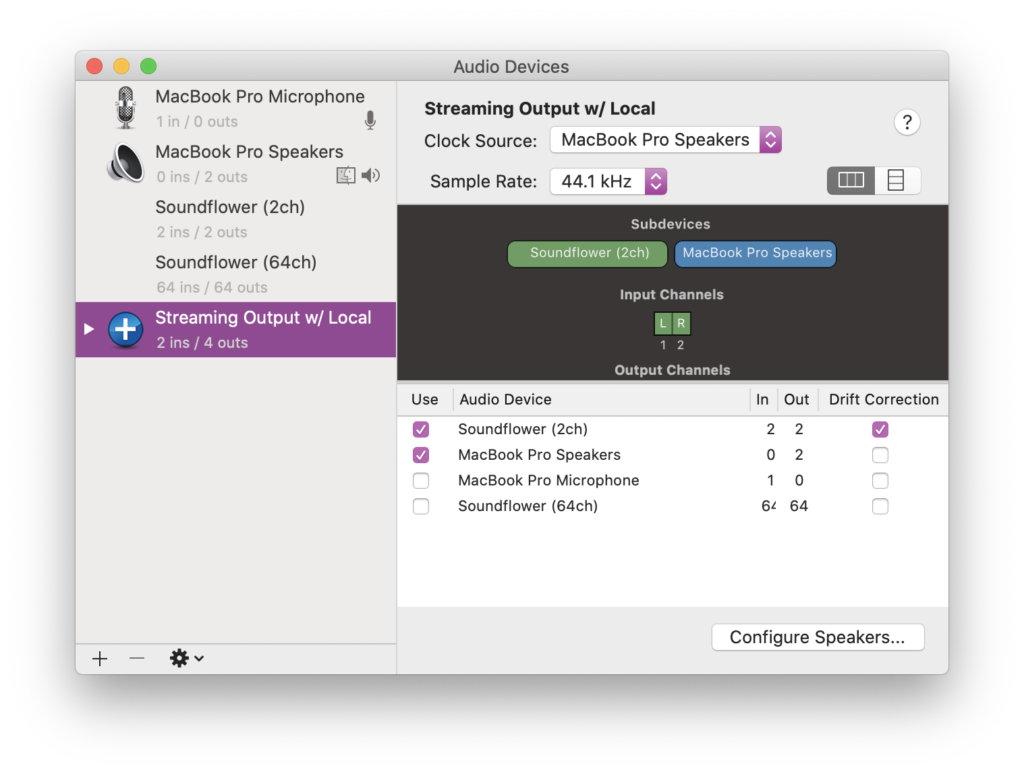
The short refresher – click on the plus sign, and create new aggregate device. As shown, select Soundflower (2ch) and your local speakers. Clock source is your hardware, so drift correction should be applied to Soundflower. Click configure speakers and make sure you are in stereo setting. Now save this with a useful name, like I did above. We’ll use this new aggregate audio device in both Zoom (as input) and Qlab (as output)

ZOOM AUDIO SETTINGS
Now, let’s go through the settings in Zoom, to help us ensure the best audio playback possible. Open up the application on your desktop. Go to Zoom > Preferences to open up the settings, and navigate first to Audio:

Zoom audio settings
Zoom audio settings

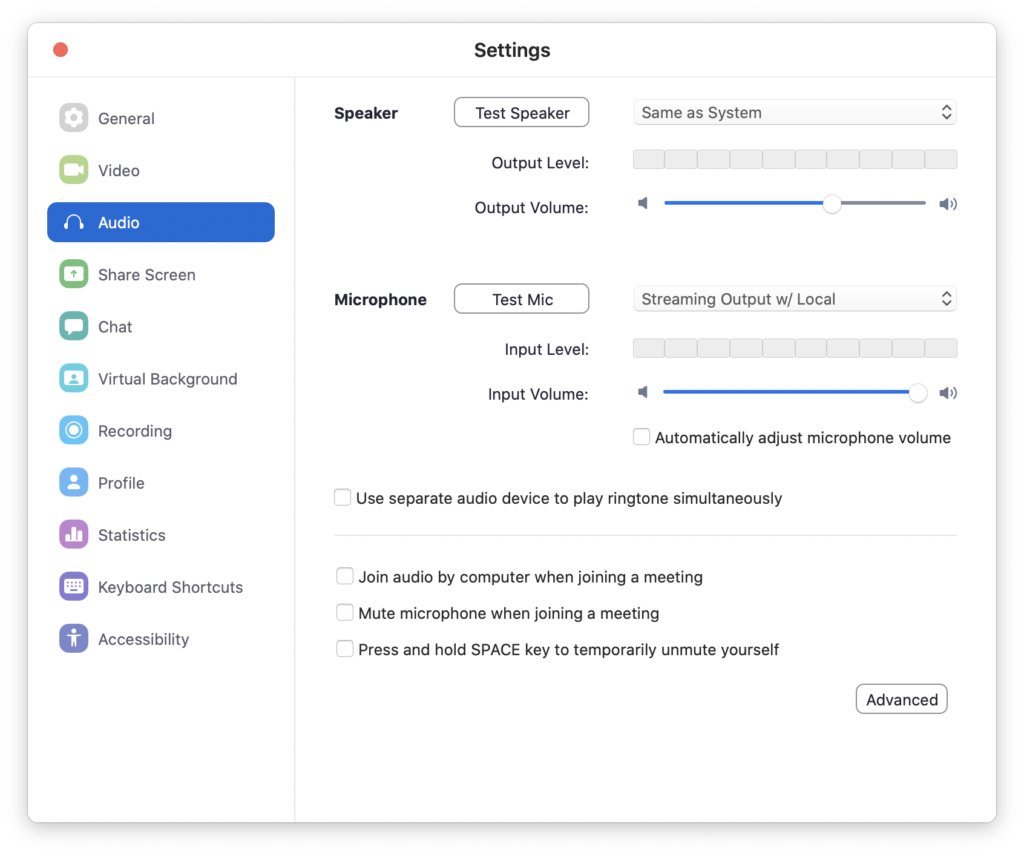
Copy these settings. My system speakers are the built-in. For mic, choose your new aggregate audio device. Uncheck automatically adjust mic volume – you don’t want Zoom changing your volume because one cue is quieter than another! 

You could check “join audio by computer” – but you were going to do that already, right? Uncheck everything else – especially the space bar!!! You’ll need that for Qlab!!! Next, click Advanced.

Zoom audio settings
Zoom audio settings

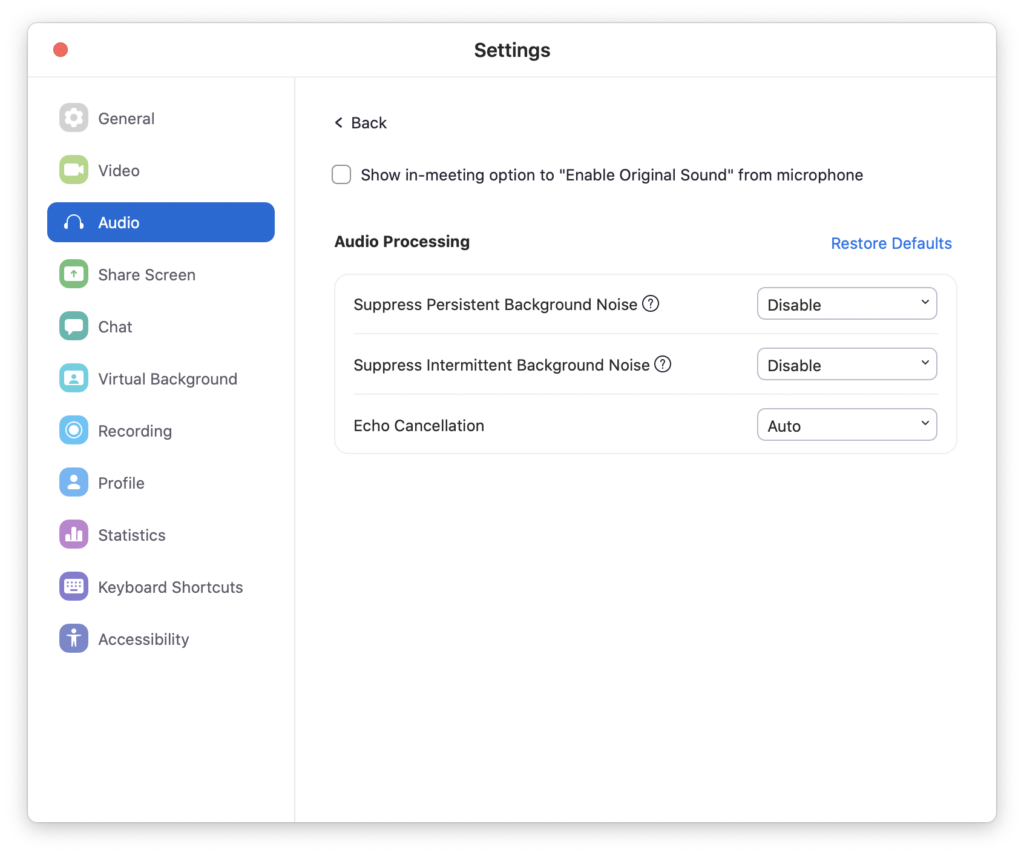
I am pretty sure you want to enable original sound – it eliminates processing by Zoom. Disable the background noise options – these are audio gates that Zoom employs to keep out background noise, and you won’t have any because you are playing back audio cues. The last thing you want is a quiet cue to be cut off because it doesn’t clear the gate settings in Zoom! Echo cancellation won’t matter – you won’t have a mic available, so it won’t be doing anything.

ZOOM CONNECTIVITY OPTIONS
Now, let’s click on the General tab on the left, and click on “View More Settings.” This will open up a browser window, and you’ll have to log in to the Zoom web portal.  

Zoom general settings

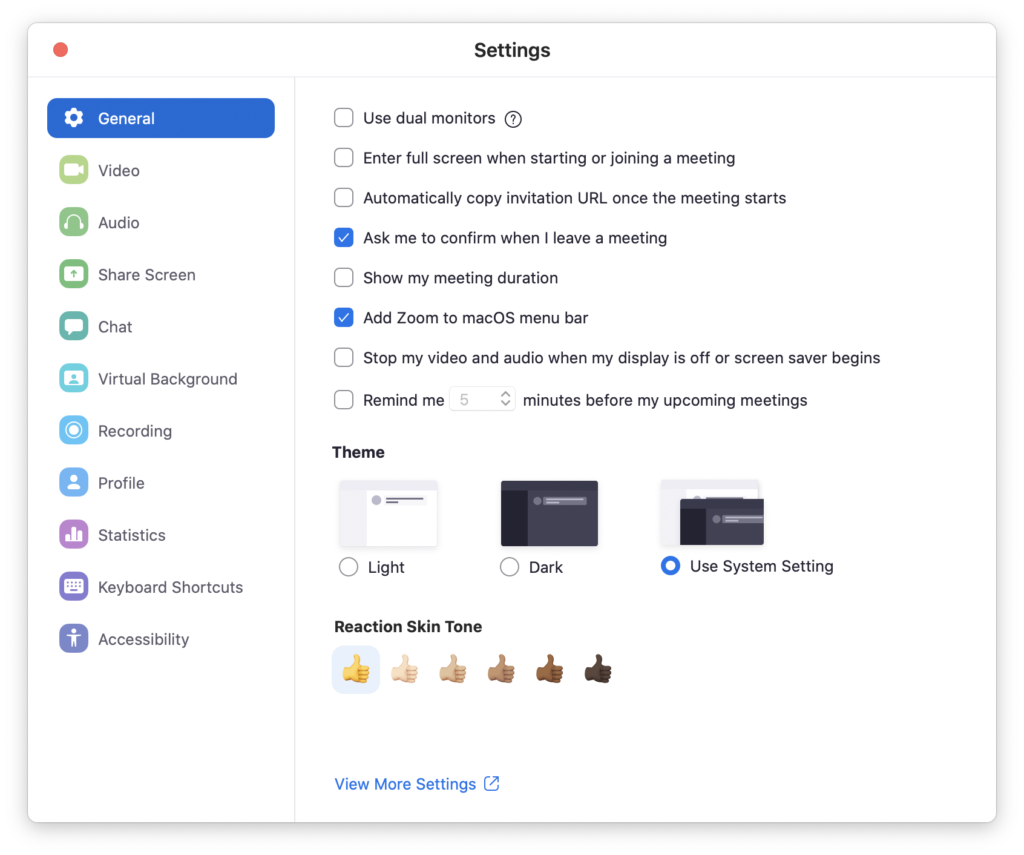
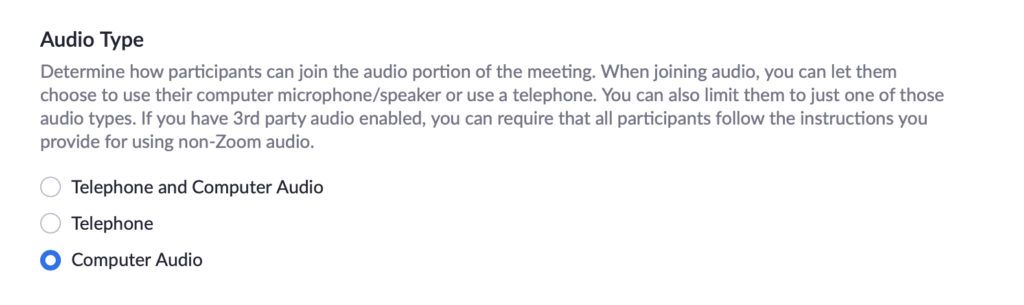
Under “Schedule a Meeting,” (on the left side) select Computer Audio, to force the audience to use this instead of a telephone connection – thereby preserving your stereo audio setup, and eliminate one variable. Again, when selecting this, audience using the mobile app will still get the computer audio feed with VOIP, instead of the telephone function. Despite using a phone.

Zoom - restrict to computer audio
Zoom – restrict to computer audio

Now, scroll down, or click on “In Meeting (Advanced)” on the left side, to get to the following settings. Select both.

Zoom - stereo audio
Zoom – stereo audio

QLAB AUDIO SETTINGS
Zoom is now setup for an online performance. Now let’s look at Qlab. Open up your show, and go to Preferences > Audio. In the audio patch of your choice, select the new aggregate audio device you created above as your output (easiest to use patch 1 for this). Then click Edit Patch, and click the Device Routing tab. 

Qlab Device Routing settings

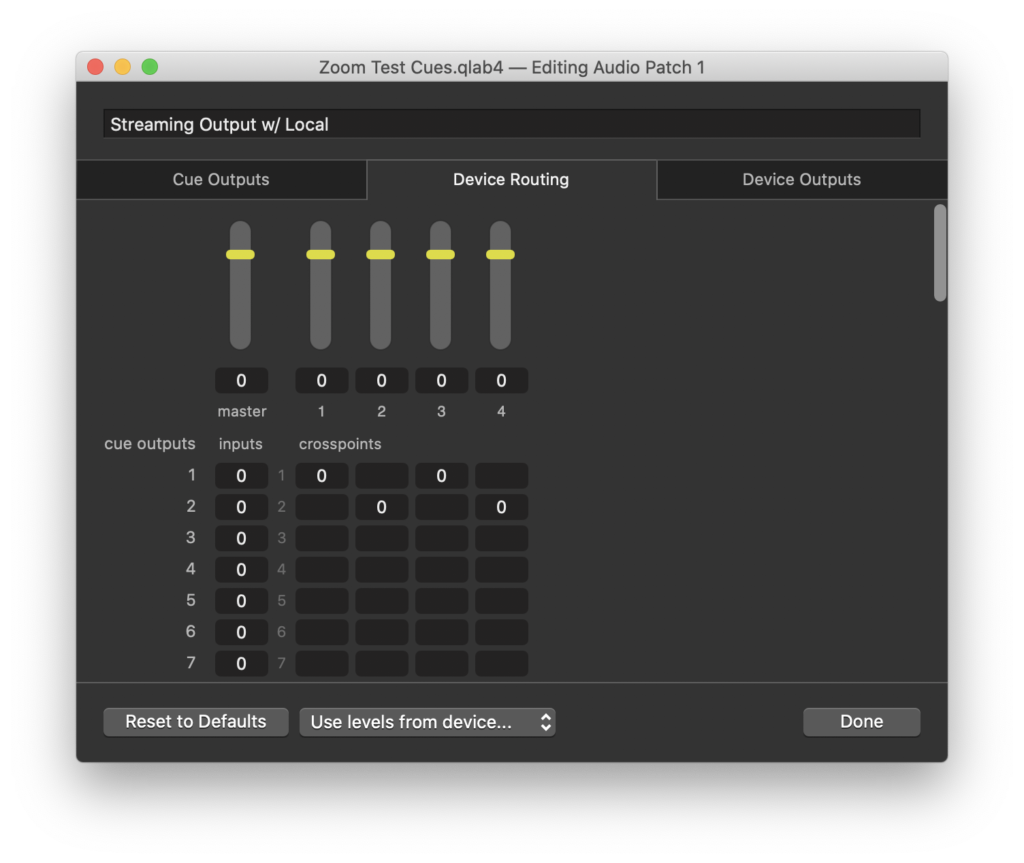
Notice how I have set up the cue outputs 1 & 2, which will be stereo left and right, to correspond with all four of my outputs by putting values in the appropriate boxes. Now move over to the Device Outputs tab.

Qlab Device Output settings

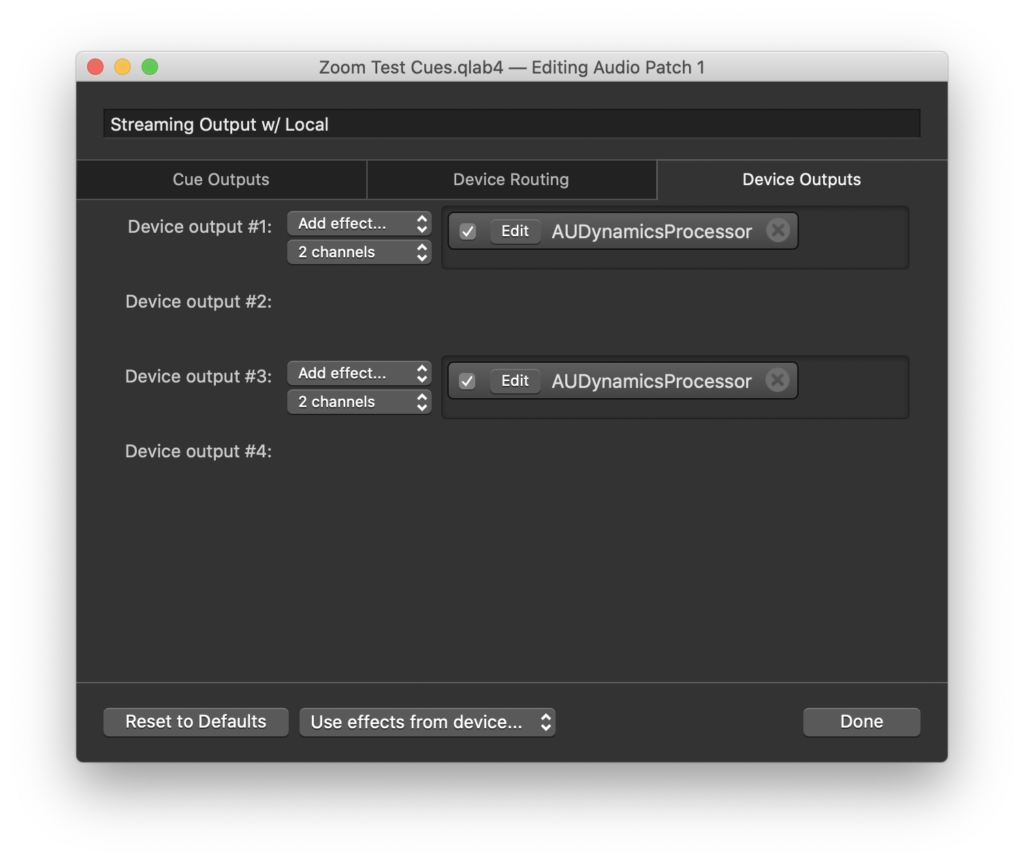
Gang your two pairs of outputs as two, two-channel pairs. I would add some compression to these outputs, to help with smoothing out the playback over what becomes a heavily compressed audio stream over the internet. Indeed, even with all of this work we have done, delicate scoring and soundscape work can still be overpowering or drop in and out. So test, test, test, and use more sparingly than you would in a show in a venue. You have a much smaller field to work within!

That should be it. You are now ready to fire sound cues in Qlab, have them play for a remote audience via Zoom, and be able to hear them out of your local speakers. In my tests, changing volume of my speakers did not change the playback volume of Soundflower’s output.

How is your show going? Did you have to change these steps to make them work better for you? What streaming platform did you use? Let me know in the comments!

Cheers!
-brian

Quick Audio Cues in Qlab

TL;DR:
A very fast primer on creating and editing audio cues in Qlab. No fades, just hard edits.

The Story:
I’m working with a group on a quick, one-night event, and in the past they have edited all of their songs for playback with hard stops or fades, burned a CD, and then used that for the show. This year they need to make some of the edits themselves, so they will be dipping into Qlab with me to make these changes.

The Esoteric Bit:
Here is a video showing all the steps you need, in real time.

Cheers!
-brian

ETC Express Lighting Primer

TL;DR:
A quick lesson on how to use one of the oldest lighting consoles out there.

The Story:
In 1993, Electronic Theatre Controls (ETC) released a lighting console called the Express. It came in a few models/sizes – the 24/48, 48/96, 72/144, and so on. Aside from some limitations on the lower numbered-boards, operationally they are identical.

Why am I writing a post about this board in 2019? Because they are STILL out there, in schools and small theatres, running shows every couple of weeks. The modern ETC Ion line is clearly a superior board, and the underpinnings of the operating system are COMPLETELY different. But, there is a UI design aesthetic that still harkens back to these humble beginnings. And yes, I’ve designed shows on it with moving lights. Indeed, because I like to focus more on sound, video, and production management, I love it whenever I am asked to work on this board, because its so easy and rock solid. I’ve only ever had one die on me (knock on wood) during a show. And in 2019, ETC will STILL service and repair this relic. And take support phone calls. Solid company, solid product.

So, a quick primer on some immediate things to know…

The Esoteric Bit:
The keypad looks pretty similar to the modern Ion and Element lines. This is really the only part I’ve seen go on these, not counting the critical failure mentioned above. But, you slam buttons on a device thousands of times a year for 26 years, you get some broken buttons. Adjusted for inflation, a $12,000 getting a $450 service job and then working like new isn’t a bad deal.

Quick note about the controls for the different sized boards – a lot of it comes down to how many channel faders and submaster faders there are. How to tell which is which, other than the labeling? They all have bump buttons below the faders. However, submaster bump buttons have a diode light built into them.

First, let’s look at area #1. The only difference from a modern console is that “Live” used to be called “Stage”. Stage is what you operate your show in. What you see on stage is what you get in the programmer. Compare it to Blind, which is where you can program your show and make changes, without affecting the look currently on stage (working blind, get it?). Blind is a great place to go if you want to edit or write cues/submasters, without calling the actual cues up. Patch is where you, um, patch your dimmers into channels. (Nowadays, lighting boards refer to addresses instead, accounting for all of the LEDs and other DMX-controlled stuff that is in lighting land). Setup is all of the under the hood stuff, including when you have to save or read your show using the 3.5″ floppy disk drive. (Yup, that’s actually a thing. There are tutorials out there for upgrading to USB, but I’ve never bothered or had the authority…)

One of the really useful features in Blind – see the extra options on the bottom of the screen? Those are soft buttons. They correspond to the keys marked S1 through S8. S2 will give you a cue list, and you can scroll through to see all of your cues, and even edit fade times etc very quickly.

Let’s skip to the area where you control the cues, areas #2 and #3. You’ll notice that there are TWO such areas. For most shows, IGNORE the other one. They are identical – it does not matter which one you use – but only use ONE. Fire all of your cues using one cue stack. Sometimes a board op will not realize it, and fire another cue using the other Go button. Then you’re running two cues side by side, and some of your lights will stop doing what you wanted them to do. So, unless you need to run two cues side by side, pick one section and STICK WITH IT. (Seriously…this one thing has befuddled more people than any other feature. I’ve seen soda caps taped over the other Go button, to keep ops from hitting it.) The rest of this section is straight forwards and the buttons you need most often are Go (fires the cue), Back (goes back one cue), and Clear (clears whatever cue is loaded…possibly sending you into a blackout if nothing else is up, FYI). You also have a Hold button, which will pause a cue, in the event that you hit Go too early. And Rate…I forget what that is. I’ve never used it.

(This photo was taken from eBay. Always leave all of those faders up all the way – your master and all four cue faders. Why are there two faders per cue stack? It goes back to the days of manual cue fading, and you still have the option of fading a cue manually.)

If you hit Go on a cue, and don’t want to wait for the time duration to finish, just run the two cue faders down to zero and then back up to 10. That will force the cue to complete immediately. 
The section I’ve circled #4 is very useful. Some quick keystrokes:

  • Record a cue in Stage – type in the values of the channels you want, or bring up the channel faders, to get the look you want on stage. Then hit Record, Cue, type a cue number, Enter.
  • Record a cue in Blind – type in the number of the cue you want, type Channel, the number, then the value of what you want, (lather, rinse, repeat,) then hit Record, Enter. But, if you are editing an existing cue, you still have to hit Record, and then enter to confirm that you want to save your changes. 
  • Record a submaster in Stage or Blind – same as writing a cue, only hitting the Sub button instead of Cue. However, there is a shortcut – typing Record and then hitting the bump button below the submaster fader. (If you overwrite a submaster in this way, the bump button light will blink until you run the fader from 0 to 10 and back.)
  • Change the fade time of a cue – go to Blind, type Cue, the number of the cue, Time, enter a time, Enter Enter. (This makes your up time and down time fades the same. You can also make them different, as prompted on screen.)

Channels and Dimmer– this is section #5 that I’ve circled. You can manually call up channels (Channel 2 at 45 Enter) to adjust your live, or Stage look, or program in Blind. You can do a Dimmer check (Dimmer 47 at Full Enter). Or you can Patch. In patch mode (next to Stage and Blind), you patch Dimmers into Channels. So “Dimmer 19 Enter Channel 30 Enter” makes channel 30 control dimmer (or address, in the case of things like LEDs) 19. 

Here is a button that can save you a lot of work – #6, Release. This will clear the programmer of anything you’ve typed a value for. It will not clear channels adjusted by a fader. If it is on screen and in red, Release will clear it.

Lastly, #7, the Arrow keys. Basically help you navigate screens and lists. 

Cheers!
-brian

Slice and Dice in Qlab!

TL;DR:
Remix your audio files on the fly in Qlab, building loops and vamps.

The Story:
This is a topic that I was discussing with my friend Matt the other day. Everyone who has used Qlab has used it to play back sound files. Its quick and easy to get comfortable, and trim files to get tight starts and ends, etc. Or maybe, like me, they have a favorite phone ring wav file with multiple kinds of rings on it, and trim it to the particular ring that is needed.

Beyond this, the “Time and Loops” tab of audio cues also allows you to do some basic re-arranging of the sound. Depending on your needs, it can save you from sending the audio out to a DAW to create a new edit to be brought back into Qlab.

The Esoteric Bit:
Here is a quick primer on how to use the Slice feature on this tab. In my example, I’m setting up the sound of an old car starting up it’s engine. First you hear the click of the ignition, then a couple of whirs as the key is turned, and then the sound of the engine fighting to turn over.

What if that sound of the key turning needs to be longer? Maybe the actor is hamming it up turning the key, and needs a little more time. Well, we could bring that sound file into a DAW like Protools or Logic or Reaper, slice up the file, duplicate the part and rearrange the edits, then bounce back down to a new wav file, and put the new file into Qlab. But that’s more work than I want to do in this instance. I will create what are called slices.

Click in the timeline, and click the Add Slices where you want to create an edit. Here, I created slices at the beginning and end of the segment I wanted to repeat – the key being turned. (You can also drag and highlight a single section, click Add Slices, and two edit points will appear.) You can, of course, drag the slices around and reposition them as needed.

In each created slice, you will see a number in the bottom middle of the slice. This is the number of times the slice will repeat. Note that you can not skip areas – this is strictly linear slicing and looping. In fact, if you put the number “0” in one of these slices, you actually get an infinity symbol – meaning the slice will loop until you tell it to do something.

Let’s say the scene is a comedy, and the actor is REALLY hamming it up as they turn the key, and they need to be able to milk the laughs before moving on. In this case, we’d use this infinity slice, and use a Devamp cue. 

Devamping means that the loop will stop at the end of the region that has been set to loop, instead of just cutting out immediately. Makes a lot more sense. If this were a musical cue, this would allow us to end the musical phrase before moving on. In this example, Cue 1 plays the begining of the wav file, and loops the sound of the key turning, and Cue 2 devamps that loop and continues on to the rest of the file in Cue 1. Here’s a video with it in action:

Slicing, vamping, and devamping loops example (VIDEO)

It doesn’t completely replace your need for editing sound effects in a DAW, but it certainly helps to be able to do quick and easy things. More importantly, it allows you to be able to create a dynamic cue that can work with the performance, in real time, and react to it.

Cheers!
-brian

Get more out of ancient ETC Express lighting boards, using Qlab and MIDI

TL;DR:
Use that ancient lighting console in new and exciting ways, by integrating your lighting cues with the rest of your show in Qlab! You can trigger Cues and Macros!

The Story:
The first big Qlab design I ever did was a show requiring me to design and run lights, sound, and video, in a theatre I had never been to before. No big, right?

The theatre in question had a venerable ETC Express 24/48, and thanks to a MIDI adapter, I started using the trick I have used ever since, which is to have Qlab trigger my cues. So lighting was able to fall in line with all of my other cues.

Other than working in tiny theatres where someone has too many jobs, why is this useful? Here are some examples I’ve done:

  • Dancing at Lughnasa– having the radio power on, complete with light, and have music start playing from that radio, in the proper operating order (power, light warms up, sound fades in).
  • The Laramie Project – syncing camera sounds with flashing strobe lights
  • Rumors – crossfading music at the top of the show – from the front of house speakers to the living room stereo on stage, while also activating the power on the stereo practical during the cue (and thereby removing the practical’s power lights from the previous black out cue)
  • Concerts – slaving video and lighting cues together

Using MIDI (or more properly, MSC – MIDI Show Control) you can trigger both Cues and Macros on an ETC lighting console. In a later post, I will bring this process up to the modern era, and show how to do this with an ETC Ion lighting board. But, considering how many old Express boards are still out there, this is continually a useful topic. I myself will probably need to do this in the coming months, and use this page for my own references!

The Esoteric Bit:
This works with all ETC boards that use the old “console software” operating system. This includes the following:

  • Express 24/48
  • Express 48/96
  • Express 72/144
  • Insight
  • Insight 2
  • Insight 3
  • Expression
  • Expression 2
  • Emphasis Server
  • and many more. Again, I will post later about the ETC Ion and other more modern boards.

You will need your computer, the lighting board, and a MIDI>USB adapter. I am a big fan of the M-Audio Uno, because it’s cheap and works perfectly in a variety of scenarios. (Connecting it can be a little weird, as the plugs are labeled in a way that seems backwards to some people. Just note that the MIDI plugs are labeled “To MIDI In” and “To MIDI Out” and you’ll be golden.)

Install the drivers for your MIDI device, restarting if need be. Fire up Qlab, and go to the preferences for MIDI Controls. Make sure “Use MIDI Show Control” is selected. The Device ID is the ID for your computer in this MIDI network.

Next go to the MIDI preferences. In the dropdown for the “MIDI Patch” of your choice, you should be able to select your interface. (If it doesn’t appear, consult the manual.) I would also use this opportunity to make the default type of MIDI command “MSC,” since I’ll be creating a lot of MSC cues.

Qlab – MIDI settings

Now, let’s set up the board (keystrokes are for the Express, but should translate easily to other ETC boards). Plug in the MIDI device to the back of the board. (Sometimes, if I am only wanting to control in one direction, or to troubleshoot, I will plug in only the “In” or the “Out” respectively.) Then, hit “Setup” and then select “6” for Options Settings. It looks like this:

If you already are familiar with MIDI, you can probably take it from here. But here’s a quick setup to get up and running.

Type “1” to edit the ETC MIDI Channel, and set that to 1. Then, type “2” to edit the MIDI Show Control Device IDs. This part I am always forgetting what is what. Basically you are setting up the MIDI channel (or address, in lighting parlance) for the lighting board and telling it what channel/device will be telling it commands:

I’ve addressed these as 1 and 0, respectively. Board is 1, my laptop/Qlab is 0 (yes, 0 is a number).

(One thing to understand is that the numbers I have chosen are arbitrary. MIDI has 16 available channels. So you can use any combination of numbers you want. Just match them appropriately.)

Now, how do we trigger?

Back to Qlab. Set up an MIDI cue, and click on the Settings tab. You will see the MIDI Destination already populated with your device, if you used Patch #1, and Message Type will display our default, which we also set up above.

Qlab MSC settings

For our purposes, we will need to set up the Command Type as “Lighting (General),” and the Device ID to the number we set above on the Express. In this example, make it “1.”

To control the Express, we have two types of Commands that we can send.

  • The default, “GO,” sends a GO command to the cue that you specify in the “Q Number” field. (We will ignore “Q List” and “Q Path” in this Express example.)
  • The “FIRE” command will fire any macro number that is programmed on the Express.

Now you can add lighting (or power) cues anywhere in your Qlab show.

If you don’t put a cue number in the “Q Number” field, the board will receive that command and just tell whatever cue is next to “GO.” Maybe that’s a feature, maybe it’s a trap – all depends on how you decide to program your show.

Conversely, you can run your Qlab rig from the lighting board. All you have to do is number a cue in Qlab that matches the number on the lighting board that you want to sync with. The nice thing, if you decide to go that route, is that Cue numbers in Qlab are unique across the entire workspace. So it doesn’t matter what Cue List you have up front – Cue 20 on the Express will fire Cue 20 in Qlab, no matter what Cue List it lives in.

I will write another post about controlling the ETC Ion and Ion XE when school starts up again and I’m at the board. I’m also going to give you some more ideas on how to use this newfound power you now have.

Cheers!
-brian

A (Brief) History of Sound Reinforcement

I’ve had to teach about live sound in so many ways to various audiences over the years. I have always felt that an understanding, however cursory, of the past and development of the tools we currently have is key in understanding how and why we use them. Like graphic design and desktop publishing (a field that I spent many years also working in), there is a lot of terms and jargon from decades of development, and being able to cut through that can really help students and early career sound engineers keep it all straight.

Here is an excellent video that does a great job summarizing the development of the PA system (shared with me by NVCC’s technical director Bill Cone). It’s 30 minutes long and covers a few thousand years in a delightful accent, so it’s a good return on your time investment!

Cheers!
-brian

Changing audio levels of multiple cues in Qlab

TL;DR:
Change the audio levels of multiple cues in Qlab with a single command.

The Story:
As you get deeper into the design process, you may find that once you get into the space, you designed a set of cues too loud or too quiet. Perhaps you would like to change a number of audio cue levels by the same amount?

I ran into this when designing a production of Merry Wives of Windsor. The director was my friend John Regis, who wanted to present the play as if it were a ‘70s sitcom. So, as part of the sound design, we had laugh tracks cued up. Once I got into the space and started tech, I had to adjust my levels to something that worked within the context of the actor performances.

I didn’t want to just change the output level of my computer or Qlab, however, because that would have impacted all of my other cues. I didn’t have the option at the time of sending all of those laugh tracks to a different output/bus, so I had to change the levels of the cues. Enter this Applescript, which changes the level of all selected audio cues, up or down, by a number that I am prompted to type.

The Esoteric Bit:
Create a new script cue, and put it in your Cue List that has such things. (As I have described before, I always have a Cue List that has a number of scripts and hotkeys, so I keep them out of my show’s Cue List.)

Here is the code you will want to put into this script. I believe I found it somewhere on the Qlab User Group:

tell application id “com.figure53.qlab.3” to tell front workspace
    display dialog “Change the master level of selected cues by this much:” default answer “0” with title “Change Level” with icon 1 buttons {“Cancel”, “OK”} default button “OK” cancel button “Cancel”
    set changeAmount to text returned of result
    set theSelection to selected
    repeat with eachCue in theSelection
        if q type of eachCue is “Audio” or q type of eachCue is “Fade” then
            tell front workspace
                set currentLevel to eachCue getLevel row 0 column 0
                set newLevel to currentLevel + changeAmount
                eachCue setLevel row 0 column 0 db newLevel
            end tell
        end if
    end repeat
end tell
Now, go to the Basics tab, and assign a hotkey trigger to this cue, so that you can invoke it:

Now, select all of the audio cues that you want to change (use Command+click to select more than one cue), and then press your hotkey. (I use Control+L, for “level.”) You will be greeted with this pop-up:

Input any number, or a negative number, and instantly the master levels of those cues will change. Simple as that.

Cheers!
-brian

Silence on stage: In-ear monitors and modeling guitar rigs

TL;DR:
Modern technology offers more and more musicians more and more options…with some new unforeseen issues, and a chance to re-use those monitor wedges.

The Story:
Years ago, my band Talking to Walls made a huge leap to what felt like the next level. We spent a lot of money to work with people bigger than us, to make a big record. It sounded fantastic.

Unfortunately, our live show did not. To help protect our hearing and help us all hear better – especially our new vocal harmonies – we made the leap to in-ear monitors. We debuted their use one snowy night in Boston. It was the best show we’d played in our career at that point, and we only moved upwards from there.

An added benefit was that the audience was not getting the muffled vocals coming from the back of the monitor wedges. Overall our shows sounded cleaner and cleaner, especially as we learned to mix our instruments better (I, for one, had way to much low end in my guitar amp before that record). And we said goodbye to the noise hangovers and ear ringing!

This was back in 2008 or 2009. Little unsigned bands like ours having an in-ear rigs – especially without an engineer on our touring staff – seemed risky and unheard of. The standing order to FoH was “turn off the wedges completely” – cleaned up the mix, and saved us from engineers who didn’t know how to mix ears and avoid the dreaded “vocals in the monitor and in the in-ears” crisis of feedback.

We learned a lot about monitors in our run. As we got to bigger venues and even amphitheaters,, we started adding kick and bass to the wedges, things that the tiny drivers ear buds could not reproduce and so that we could “feel” the music more.

Nowadays, many more bands are showing up to venues with in-ear monitors. What’s more, the carefully cultivated backline of tube amps like we lugged in roadcases from city to city are getting increasingly replaced by modeling rigs. Even I, a snobby amp purist, can appreciate the ease and reduced luggage/dryage fees that result in your guitar only needing a pedal board or rack unit, with even more flexibility than my oversized board filled with analog pedals could give me.

But there’s a problem, and the audience can suffer.

The Esoteric Bit:
Here’s the simple problem that bands are starting to face – and may not even know it. Since the beginning of amplified music, what the band hears (and might consider sounding good) is COMPLETELY different from the audience. We know this and accept it. However, with the growth of in-ear monitors in the small-to-medium clubs, it means that more and more bands are getting more isolated from the audience experience, sonically. (Which is why the bigger tours run crowd mics to the monitor mixes.)

But once you start putting everything but the drummer and horns through a DI-only chain, the empassioned punters down front row start to suffer.

The band is happy – they hear guitars pouring through computer-emulated vintage-era Marshall stacks. The engineer is happy – now, only the drummer is playing too loud on stage. (As always.)

The people who rushed the stage so they could see and hear the band – the ones who really get the band vibed up and excited? All they get is drums and horns. The monitor wedges aren’t pushing much, if anything – maybe some of that kick and bass mentioned above. But these passionate fans are standing along along the same line as the FoH stacks/arrays – possibly even behind them. So they can’t hear much of anything going on.

Here is a quick an easy solution to this. Lots of rock clubs do not have front fills – those low-profile speakers dotting the edge of a stage. This would be where you would send these missing signals, to help the people down front, at a level appropriate for people so close.

If the band doesn’t mind, try taking that line of downstage monitors and FLIP THEM OVER, or otherwise turn them towards the audience. Create a new submix of whatever the people down in front are missing, and send it to these speakers!

Should the band need foldback of the above-mentioned kick and bass, then only flip over as many wedges as you can get away with, depending on how many mixes you have available.

Everyone’s happy.

Let’s hear more of that awesome guitar tone that you spent hours programming!

Cheers!
-brian

Random triggers in Qlab, and embracing spontaneity

TL;DR:
Embrace spontaneity – and actor performances – by using triggers and randomly generated cues in Qlab.

The Story:
Here’s a funny story I like to share. Back in the early 1990s, one of the biggest bands on the planet was U2. Their tour behind the album “Achtung Baby” – called Zoo TV – was one of the most ambitious of its time, and helped create and push what has become the modern multimedia spectacle of live shows. Designer Willy Williams hung East German-built Trabant cars over the stage (the album was conceived and recorded in Berlin), repainted, with headlights converted to spot lights. The stage was filled and flanked with a then-unheard of number of TV screens and video walls, filled with a huge amount of cycling video content and live camera feeds from all over the stage, including a camera feed carried around by lead singer Bono during parts of the show.

Among other things, the video content featured a number of words from a library deemed on-message by the band and designer. After all, U2 was, by this point, very involved in organizations like Amnesty International and was establishing itself as a political force. This tour was about entertainment, the then-new 24 Hour News Cycle, and juxtaposing it all together in a mess of fashion and current events. Rock and roll to make you think, as it were.

That library of words would come tumbling out on screens, like refrigerator magnet poetry. Nonsense or astute observation? The audience would decide. Sometimes there were deliberate phrases, but other parts were randomly generated. In the tour biography “At the End of the World,” I read about an embarrassing situation for the band as the random words came together to form a phrase completely contradictory to the band’s image in a non-ironic way – and some fans complained (maybe even sued).

An unfortunate, but amusing, event in the history of video projection and computers.

I’m going to give you two ideas for using triggers as a way to respond to actor performances, including random playback cues. One is from a play called “Hearts Like Fists,” and the other from “A Midsummer Night’s Dream.” If you are new to hotkeys and triggers, you may want to read this post on the subject, Triggers and Hotkeys in Qlab – a Primer.

The Esoteric Bit:
First Example: The show “Hearts Like Fists” is about a group of superhero crime fighters. It begs to be designed with lots of comic book elements. For our production at NVCC, we had a video screen upstage that looked like a comic book caption:

Photo courtesy Jonathan Curns

The video design team came up with a bunch of exclamations, mirroring this look. During the fight scenes, we wanted the graphics to appear as someone got punched or kicked – just like the old Batman TV show.

Random image from our library of fight word graphics, rendered onto the mask as an example.

But this was a dynamic show, and despite fight choreography, we wanted to roll with the timing of the actors, as well as make sure that we didn’t jump cues – just because there are supposed to be three punches and one roundhouse kick, firing four cues in quick succession sounded like a chance for error. And if the choreography changed, we would have to work that into the design. Better to just have a special button – a trigger – for special use in the fight scenes. Even more, we could randomly generate which comic exclamation would appear, so we didn’t have to overthink the design, and enjoy the moment of performance.

Create a new group – in a new Cue List, so we don’t fill up our main Cue List with junk we don’t need to see. Set it to “Random”. On the “Basics” tab, click in the “Trigger” field, and type any key that isn’t used by Qlab – I like to use the “0” on the numeric pad on the right, because it’s big yet out of the way.

Every time you hit your trigger key, no matter where you are in the show, that Group cue will fire. And since the group is random, it will take one of any of the images in this example and put it on screen.

To breakdown the example above, the trigger plays the normal Group cue, which is outlined in blue. The purple, square-cornered “fight words” Group that gets played is set to randomly fire one of its child cues:

All of the child cues inside of it are simultaneous cues – the video graphic that gets displayed (no fade in, just pops on screen), and then a delayed fade cue to take the image out.

Now, in the main Cue List, add a Note cue, telling the operator what to do. You could, in theory, use a Play cue to do this and label that, but I like to keep actions consistent – the trigger is the way to fire this cue.

Now we hit the trigger during a fight scene, and every time we hit it something new gets added!

(Rendering of what the screen looked like during the big final fight.)

Second Example: In a variation of this idea, during A Midsummer Night’s Dream, there was a comic bit where the lovers are finding a place to sleep at night, off in the woods. He wants to sleep beside her, and she keeps telling him to move further away, because they haven’t gotten married yet. Every time he settles down, their theme starts to play, until she interrupts and tells him to keep moving.

It’s amusing. I wanted to give the actors the freedom to do this as much as they wanted, and milk the crowd’s reaction if they wanted to. Driving the performance by the design or direction – “You are going to do this four times, no more, no less” – is the totally wrong approach, and re-using the same cues could create confusion. So we had the theme music available on a trigger, and another trigger to stop the music, with both cues off in a Cue List separate from our main show cues.

Then the operator could just bounce back and forth between stop and start, and at the end of the comic bit, just let the track play.

This avoids the dreaded “I’ll just scroll up and re-run the same cue.” By using triggers you can respond more quickly to what is happening on stage, and keeps the linear flow of the show’s cues. I put a memo in the main Cue List, reminding the operator what to do, and then followed it with the cue that would naturally fade out the music and soundscape at the end of the scene and start music for the next scene.

That’s it! Hopefully this gives you some ideas and flexibility in your own designs. There can be more than one GO button!

Cheers!
-brian

Triggers and Hotkeys in QLab – a Primer

TL;DR:
QLab can have more than one GO button. Here is why that’s a good thing.

The Story:
I realized that, in the course of this blog, I have talked a lot about using hotkeys and triggers in QLab. While I have sometimes explained how to do that, I wanted to put out the definitive post on this topic.

By default, QLab uses the space bar as the GO button – easier than clicking the GO button on the screen. Ok, great. Advance through your show cues in sequential order, one after another.

Hotkeys and triggers allow QLab to react to other, shall we say, external stimuli in the course of a performance. Any key on your keyboard that isn’t used by the application can be mapped to any one cue – pressing the zero on the numerical pad could, for instance, launch a cue that is totally out of the sequence of your show, or even in a different Cue List from the one you are in.

Imagine having a cue at your disposal at any time, with it’s own button dedicated to it. It can open up a lot of options as a designer, and allow you to react to a performance, rather than rigidly scripting it.

Another way of activating a cue like this would be to use MIDI – a musical note or patch change from the band, or MIDI input from another program you are using, could be used to trigger a cue.

I worked with an electric violinist one time named Mark Wood (http://www.markwoodmusic.com) who had all of his backing tracks running in Qlab. Between his effects pedals and the notes he was playing, his “band in a box” could follow along with him.

In an upcoming post, I will in detail about syncing/triggering your cues with incoming MSC (MIDI Show Cue). For now, we will just deal with triggers that we can assign in the “Details” tab of the Info panel.

The Esoteric Bit:
This is super easy. In your QLab show, select the cue you want to trigger, either by Hotkey or by MIDI. With the Info panel open, click the “Details” tab and you will see this:

Basics tab in Qlab, where we can assign triggers.

The right side of this panel is where we will be focusing.

If you want to assign a Hotkey, click in the field and hit the key on your keyboard that you want to use. If the key is already used by the program, then you will get a warning.

Qlab hotkey – attempting to apply a key already in use by the application.

You can’t use modifier keys on their own (Control, Option, Command…), but you can hit more than one key in this field.

Qlab hotkey, using Control+C

If you want to remove this Hotkey, simply click the “X” to clear the assignment.

For MIDI triggers, you would do the same thing. Click the box, hit “Capture” and send a MIDI command. Because of the way MIDI is transmitted, you can select many input variables.

MIDI triggers in Qlab can use many different parts of a MIDI message.

You can also trigger a cue based on the clock time (using your system clock’s time…if you’ve jumped time zones and not connected to the Internet then know that it will be off!). This is great if you are doing an art installation!

Wall clock trigger in Qlab, which you can set for the Date and Time.

And finally, if you are using Timecode you can use that too. Timecode is often a video thing. And if you don’t know if you are using it, chances are you probably aren’t. But if you are getting timecode information, you can use a specific point in time to trigger a cue.

Cheers!
-brian