Audio Playback for Streaming Online Performances (like Zoom)
TL;DR:
More and more acting companies are moving online to bring their performances to audiences, via Zoom and other streaming platforms. Here’s how to work with playback cues in this environment.
The Story:
At the time of writing this (April, 2020) a deadly pandemic has been sweeping the globe. In response to people all over the world staying home, business closing, and large gatherings being banned, theatre companies have started experimenting with virtual performances. Actors perform in front of webcams at home, and find novel ways to interact with their fellow cast across the internet who are locked up in their own homes.
One of the earliest groups to rise to prominence doing this has been “The Show Must Go On(line)” – which has been ripping through Shakespeare’s plays, in order. Check them out at https://robmyles.co.uk/theshowmustgoonline/.
Virtual meeting platforms, like Zoom and WebEx, are moving from corporate boardrooms and laptops of tech savvy consumers to become part of the everyday language of quarantined populations. Zoom, in particular, has become a runaway hit, and the name has become a verb, much like Google did in the early ‘00s.
We are going to look at sound cue playback in this environment. And, of course, we’ll be using Qlab! For the streaming service, we will focus on Zoom for examples – but many of these features and settings are available on the other platforms as well.
NOTE: For this post, despite talking about sound, we are ignoring the obvious issue of actor mics. There are so many ways to go – built-in mic, webcam with built-in mic, USB mic, mics with an audio interface… It all comes down to budget, room sound/treatment, cast size, etc. It’s still early on in the shift to online, and standardizing hardware across an entire acting company can be a big budget line item. Is it a good idea to? Sure. But we are all just trying to find ways to make this work in the new reality…)
The Esoteric Bit:
We have a lot of ground to cover; here are the areas we will examine:
- End user audio
- Internet data and latency
- Latency measurements
- Soundcard setup
- Zoom audio settings
- Zoom connectivity options
- Qlab audio settings
END USER AUDIO
The first thing to understand is that we have very little control over the end user’s experience. In a venue with an audience, the sound designer and engineer can manipulate the audience’s experience, and can check what it sounds like from any seat of the house.
Broadcasting over the internet, however, we have no idea what ends up happening to the sound once it leaves our network and hits the ’net. Audience members tuning in may be listening via headphones, ear buds, laptop speakers, a stereo system… anything. So they may not have a subwoofer to help them appreciate the depth charge sample that you’ve cleverly hidden in that cue in Scene 5 (I’ll come clean and admit this is the Wilhelm Scream of my designs…)
Furthermore, they might be connecting to the audio feed using their computer…OR THE PHONE. Many services allow you to dial in with a phone to listen in. Is it a landline? A cell phone? Each can sound different. Regardless, if they are using a phone connection, you can throw “stereo sound” right out the window. Telephones are in mono.
Within Zoom, we do have the option to restrict to computer audio and not offer phone connections. (People using their mobile device to tune in will be using the computer audio vs a phone connection.) So, taking this step will at least keep stereo audio preserved. Interestingly, the Computer Audio feed is also a higher quality than that of a telephone line (no specs available.).
Otherwise, accept that there is not much you can do about how people hear your sound cues.
INTERNET DATA AND LATENCY
The other big issue we have to talk about when playing back audio over the internet is “latency.” Latency is something most sound engineers and designers are familiar with now in the digital age – live and in the studio. The addition of plugins and converters adds milliseconds of time into the signal chain, and depending on what you’re doing you have multiple ways of dealing with it.
In our case, latency is the lag that happens between computers across the internet – and why musicians can not play live together over it. Everyone hears things at different times as data reaches their computer.
Without earning a computer science degree, here is how data travels on the internet. The computer I am using here in Connecticut, USA, plays an audio cue online. Someone tuned into my stream in NYC will hear it – after those bytes of data have pinged, likely, through servers all over the East Coast, at a minimum. It has to travel from my computer, to the service’s server in, say, Durham, NC, then over to the viewer. But the way internet traffic moves, it is more complicated than this – that one sound cue might be broken up into multiple packets, and is scattershot across the internet, like a pile of letters in the post office taking different routes and being reassembled at the critical hubs. It sounds messy, and it is, but networks are incredibly efficient at moving data along, and it happens incredibly fast nowadays.
LATENCY MEASUREMENTS
The upshot is that the testing I have done with Zoom (and getting similar results on WebEx) yields the following latency:
Test 1:
Audio computer, on wired LAN, sending cues to an audience computer, also on a wired LAN: 100-200ms of latency
(Note, these two computers were on the same network – that data had to leave my house, go to the Zoom servers, and come back to my network. So it doesn’t matter that they were sitting next to each other on the table.)
Test 2:
Audio computer, on wired LAN, sending cues to an audience smartphone, connected to a cellular network: 500ms of latency
(That’s half a second!)
Imagine now that you are trying to precisely time your cue against an actor’s words or action. That is a LOT of lag! Obviously, wired LAN is better than Wifi, so you are taking advantage of the fastest speed possible. Regardless, however, such latency may impact your performance and cueing, so you will need to take this into account and adjust accordingly.
There is nothing you can do about these numbers, other than keeping your own connection as healthy and fast as possible. This is just how the internet is put together.
SOUNDCARD SETUP
Video conferencing software works like your cell phone – you don’t hear your own voice. (Which is why many people speak louder into a cell phone than into a landline.) So, let’s set up a sound card that Zoom will receive audio from, while also playing back locally. You don’t need a fancy audio interface. We will do this with what your Mac came with!
For many years, Macs often shipped with a free, open source, virtual soundcard called Soundflower, with 2- and 64-channel versions available. It allows applications to route audio between each other. Soundfower got sold, the company retired it, and now sells an application called Loopback. Therefore, Apple stopped shipping computers with it. But the good news is that it is still available, still free, and still works. You can download it here:
https://github.com/mattingalls/Soundflower/releases/tag/2.0b2
Install this, and then open up Audio Midi Setup on your computer. We are going to create an aggregate audio device, something that I wrote extensively about in a past blog post:
https://www.rocktzar.com/aggregate-audio-interfaces-osx-use-qlab-course/
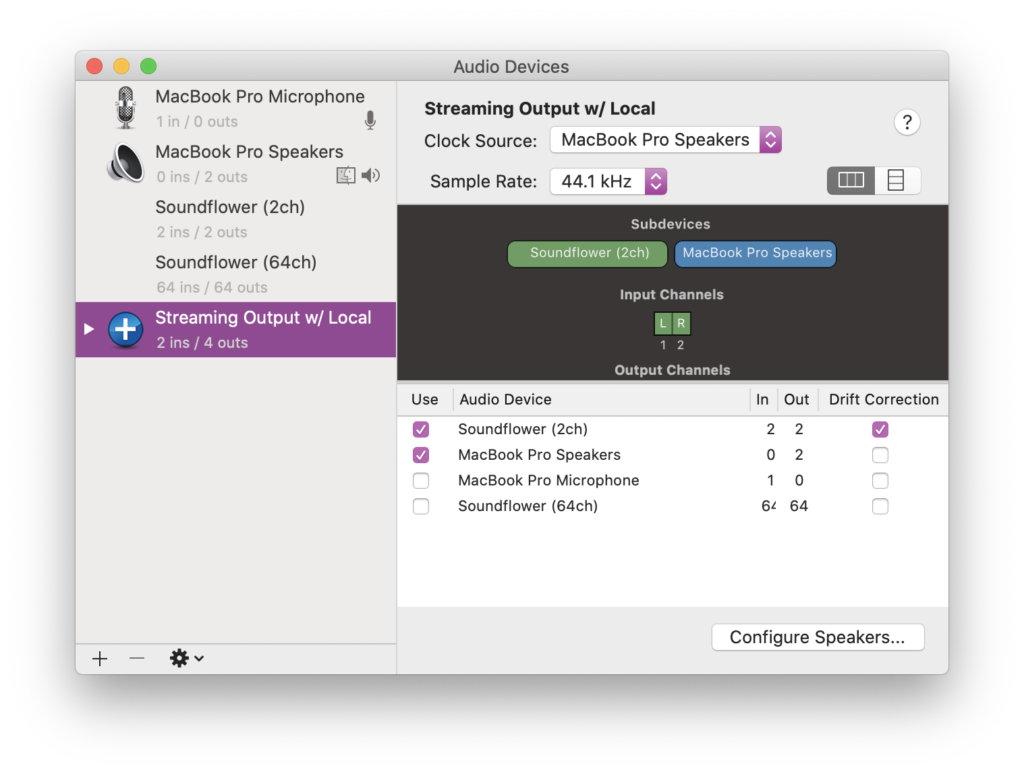
The short refresher – click on the plus sign, and create new aggregate device. As shown, select Soundflower (2ch) and your local speakers. Clock source is your hardware, so drift correction should be applied to Soundflower. Click configure speakers and make sure you are in stereo setting. Now save this with a useful name, like I did above. We’ll use this new aggregate audio device in both Zoom (as input) and Qlab (as output)
ZOOM AUDIO SETTINGS
Now, let’s go through the settings in Zoom, to help us ensure the best audio playback possible. Open up the application on your desktop. Go to Zoom > Preferences to open up the settings, and navigate first to Audio:
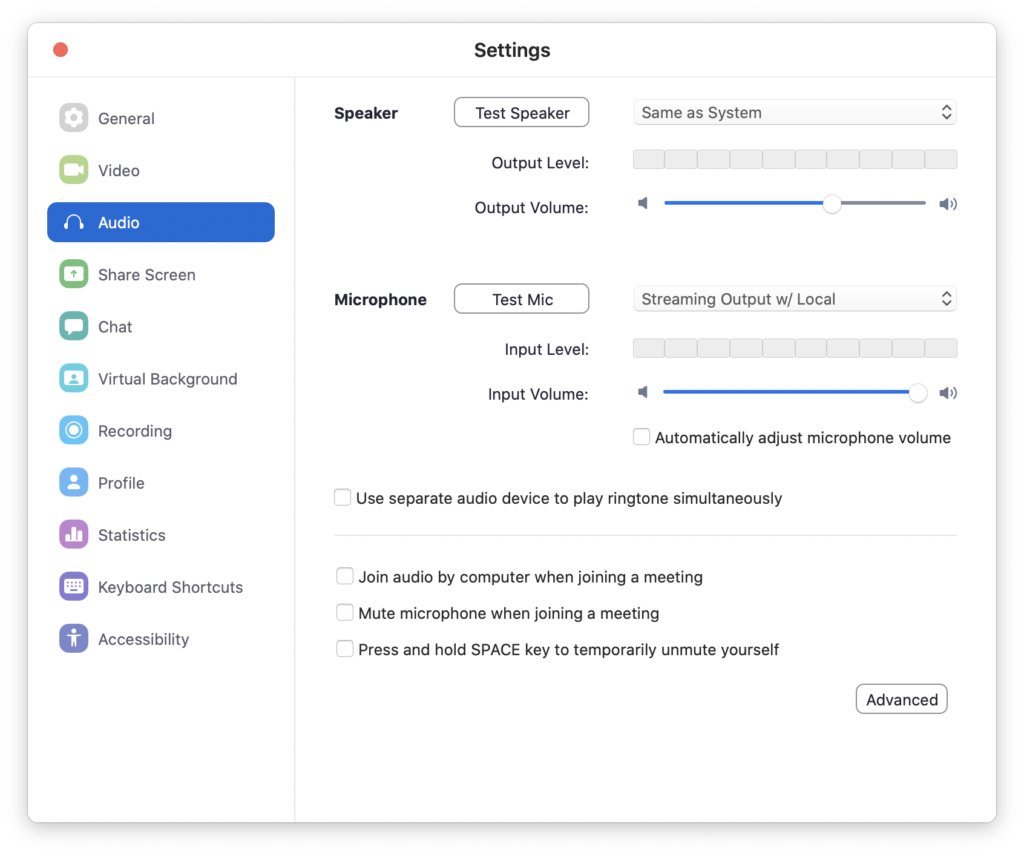
Copy these settings. My system speakers are the built-in. For mic, choose your new aggregate audio device. Uncheck automatically adjust mic volume – you don’t want Zoom changing your volume because one cue is quieter than another!
You could check “join audio by computer” – but you were going to do that already, right? Uncheck everything else – especially the space bar!!! You’ll need that for Qlab!!! Next, click Advanced.
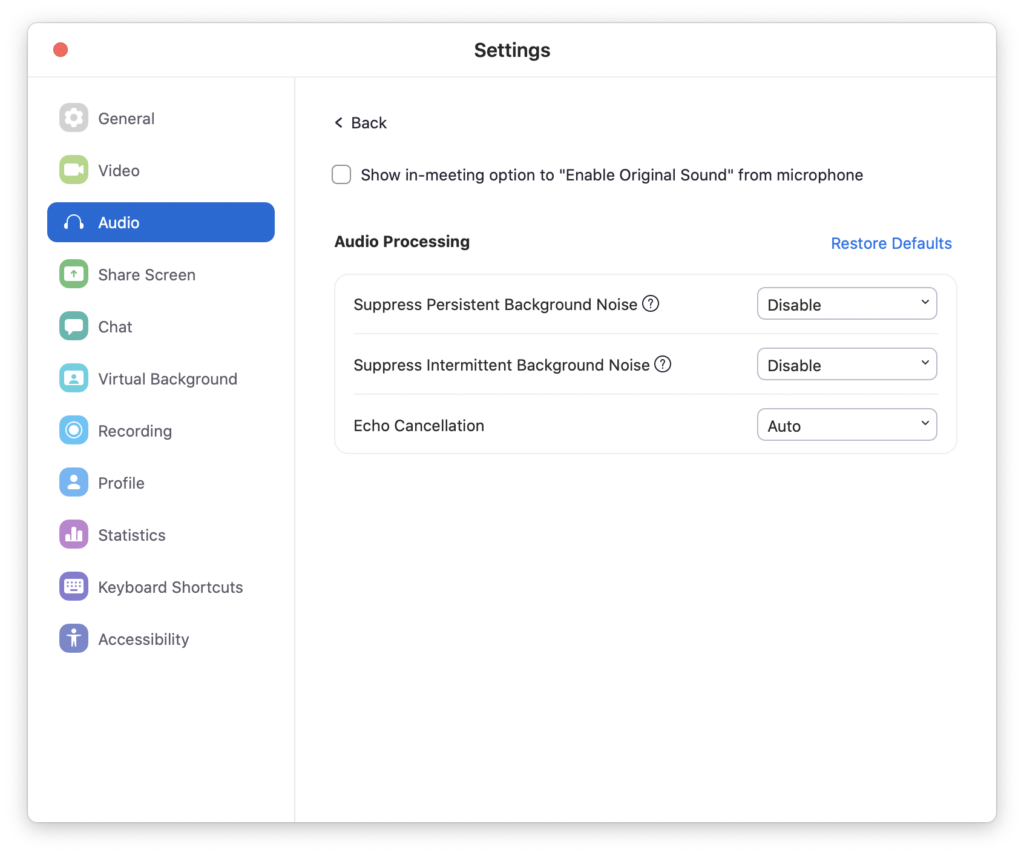
I am pretty sure you want to enable original sound – it eliminates processing by Zoom. Disable the background noise options – these are audio gates that Zoom employs to keep out background noise, and you won’t have any because you are playing back audio cues. The last thing you want is a quiet cue to be cut off because it doesn’t clear the gate settings in Zoom! Echo cancellation won’t matter – you won’t have a mic available, so it won’t be doing anything.
ZOOM CONNECTIVITY OPTIONS
Now, let’s click on the General tab on the left, and click on “View More Settings.” This will open up a browser window, and you’ll have to log in to the Zoom web portal.
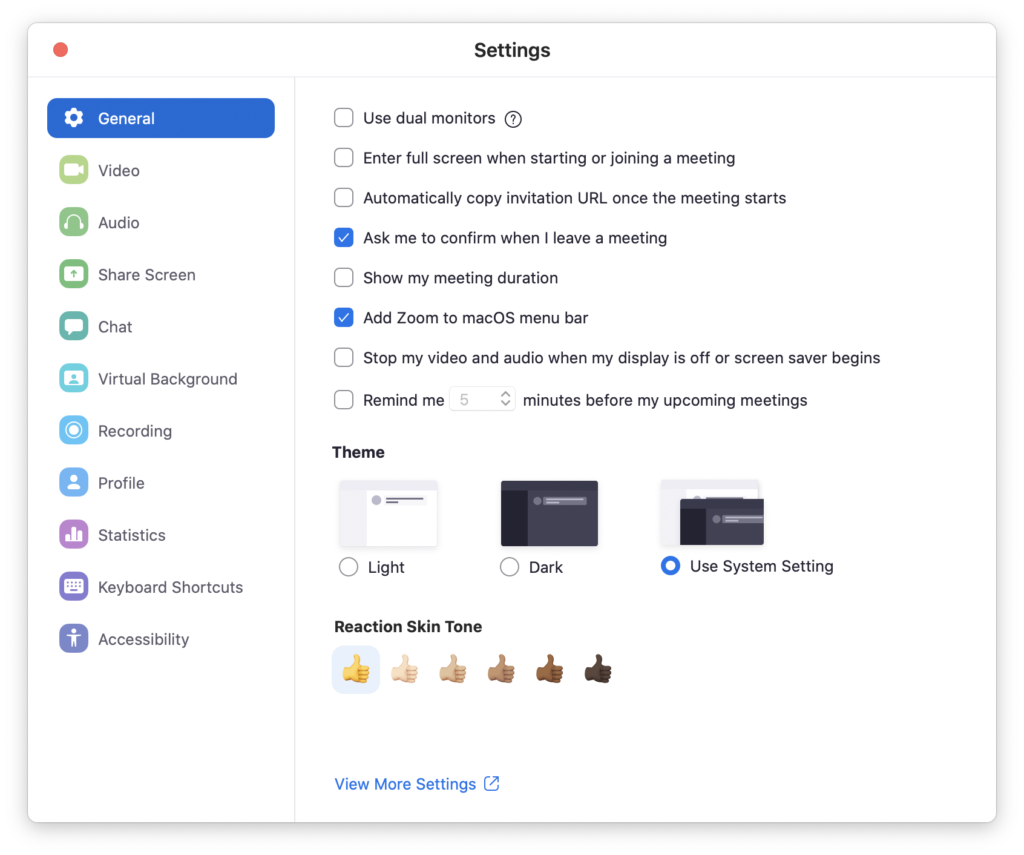
Under “Schedule a Meeting,” (on the left side) select Computer Audio, to force the audience to use this instead of a telephone connection – thereby preserving your stereo audio setup, and eliminate one variable. Again, when selecting this, audience using the mobile app will still get the computer audio feed with VOIP, instead of the telephone function. Despite using a phone.

Now, scroll down, or click on “In Meeting (Advanced)” on the left side, to get to the following settings. Select both.

QLAB AUDIO SETTINGS
Zoom is now setup for an online performance. Now let’s look at Qlab. Open up your show, and go to Preferences > Audio. In the audio patch of your choice, select the new aggregate audio device you created above as your output (easiest to use patch 1 for this). Then click Edit Patch, and click the Device Routing tab.
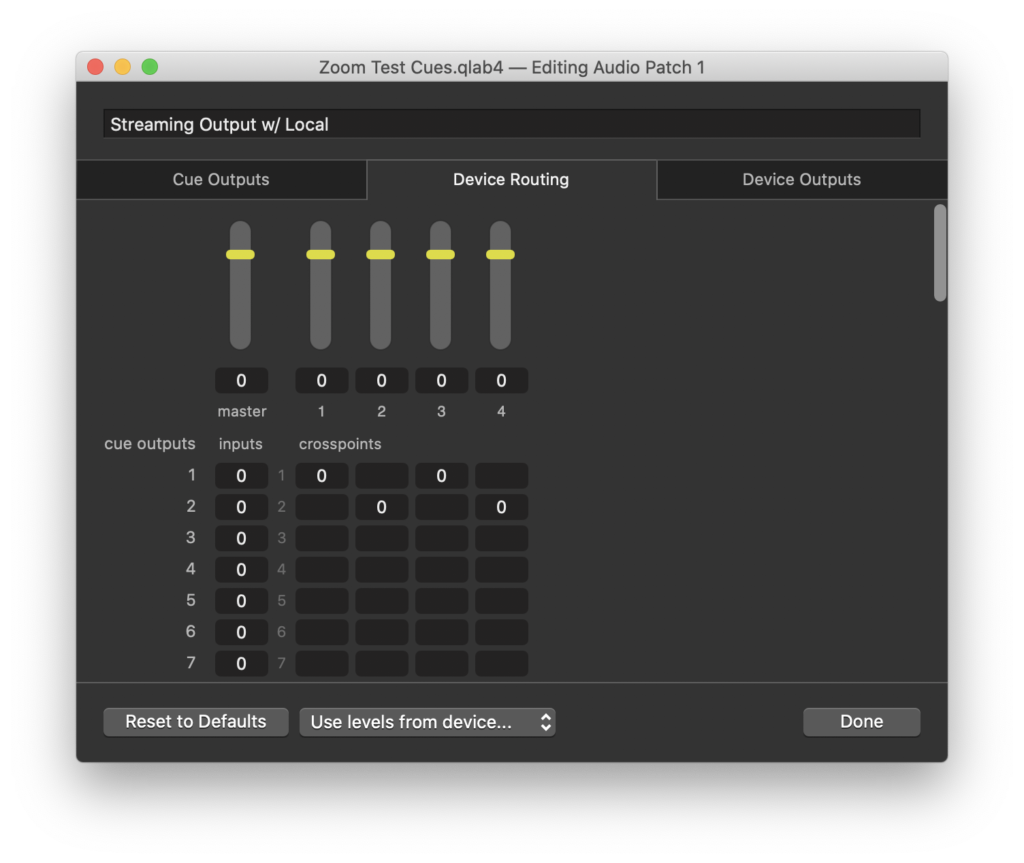
Notice how I have set up the cue outputs 1 & 2, which will be stereo left and right, to correspond with all four of my outputs by putting values in the appropriate boxes. Now move over to the Device Outputs tab.
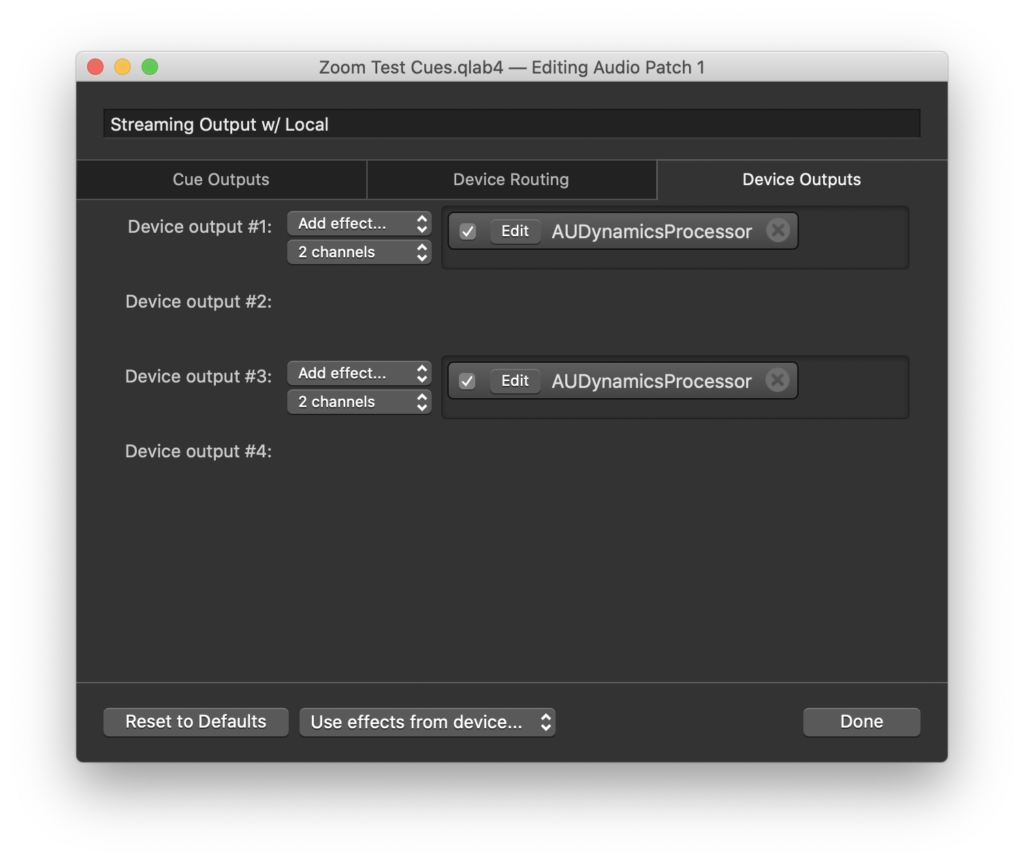
Gang your two pairs of outputs as two, two-channel pairs. I would add some compression to these outputs, to help with smoothing out the playback over what becomes a heavily compressed audio stream over the internet. Indeed, even with all of this work we have done, delicate scoring and soundscape work can still be overpowering or drop in and out. So test, test, test, and use more sparingly than you would in a show in a venue. You have a much smaller field to work within!
That should be it. You are now ready to fire sound cues in Qlab, have them play for a remote audience via Zoom, and be able to hear them out of your local speakers. In my tests, changing volume of my speakers did not change the playback volume of Soundflower’s output.
How is your show going? Did you have to change these steps to make them work better for you? What streaming platform did you use? Let me know in the comments!
Cheers!
-brian