Parallel Compression in Live Mixing (Compression Part 2)
TL;DR:
Parallel compression is a common studio mixing technique. Why I use it live. Latency and digital mixers.
The Story:
Parallel compression was introduced to me when I was mixing a project in Protools (thanks to Greg Giorgio, the same guy who taught me about versioning (https://www.rocktzar.com/visions-for-your-versions/). For those who need to google that, it’s the awesome process whereby your original channels (like all of your drums) pass not only to the main mix, but also to a subgroup, where they get squashed further by heavier compression – which, as a soloed group, may sound like way too much compression. This subgroup hits the main mix as well, which pushes the overall intensity (of drums, in this instance) of the instrument, but the original channels maintain the character you were after in the recording.
Another part of this, in the studio, is using multiband compression, so that the lows, mids, and highs get their own unique compression settings that are appropriate for the song.
In last week’s post, https://www.rocktzar.com/multiple-compressors-in-live-audio/ I talked about bussing channels together for a second round of compression, which helps unify a section as well as tackle dynamics in a more graceful way. This week, I’d like to approach that from a parallel compression standpoint – and why I sometimes choose that route.
The Esoteric Bit:
Last week we looked at a symphony mix. Let’s look at a rock band, and make some quick routings and groupings. We will use the same assumptions of a mix as we did in the DCA & Groups post: https://www.rocktzar.com/audio-acronyms-dca-vca-groups/. For illustration, let us look at the guitar portion of the mix – 6 channels.
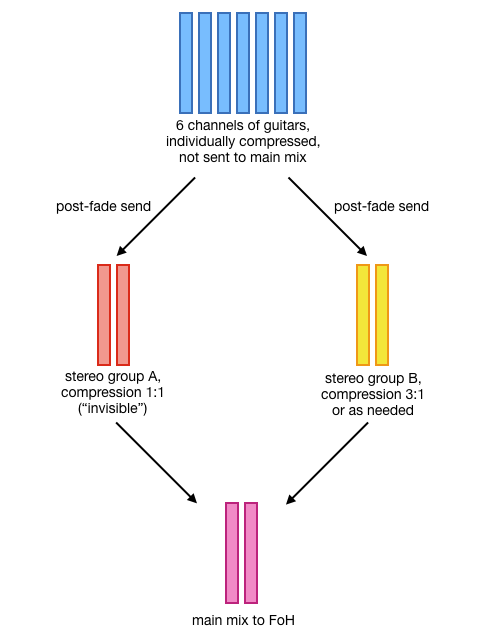
To manage the myriad of tones that guitar players will create, and keep the mix a bit more “together”, it’s often necessary to put a little compression on each channel, just to take a little edge off the top. Individual results of course vary. Once I get all of the guitars sounding good individually, I’m going to send them post-fader to two stereo groups (remember, I’m panning things all over the place to create space and discern parts from each other), and not to the main mix. As described last week, one of those groups is going to have a secondary compression put on it. This is going to be to taste – it might not be as heavy handed as the drum recording example I opened with, but it’s going to dip in and hit most of what’s going on in this group mix. The right settings are going to depend on the type of music.
So now I have a compressed guitar stereo group. Nothing’s going to rise out too much and wreck the balance I have created, via this group. And it’s glueing the section together – I’m creating a pretty solid wall of guitars here. But, taken on it’s own, it might be a little emotionally dull, overly compressed. We want excitement and dynamics. We might want some of that original channel’s sound to be heard in the mix – especially when the guitar solos start happening.
We could – on some boards – send the guitars simultaneously to the group and to the main mix. But there is a problem inherent with digital boards – something called latency.
Latency is basically what happens every time you add a plugin or even routing signal – the computer’s processing adds time, which is very, very short. Tiny milliseconds. But that little bit off can cause problems in your mix – like phasing. And in this example, you have two signals:
- The original channel hitting the main mix
- The same signal routed into a group, hit with a compressor, and then to the main mix
They may not align, arriving at the main mix at the same time. Without going into a deeper discussion of phasing and comb filtering, you need your signals to match, and the waveforms to be doing the same thing at the same time.
This is where the second stereo group comes into play. In this group, you will ALSO add a compressor. But set the ratio to 1:1. So essentially there is a plugin in the signal chain, but it’s doing a big fat nothing. Now you have two stereo groups, one is affected and the other not. But there are the same number of plugins and the same type of routing, so everything arrives at the main mix at the same time.

When you are mixing guitars during the show, you can boost your soloist, and bring down everyone else. (How you do this – with DCAs or mixing the channels – depends on what works for you and the artist.) Boosting the soloist is just going to hit the compressor a little harder, but that’s ok, because you have your cleaner signal going out as well.
This parallel compression trick is also very useful on vocals. Every engineer is always working hard to keep vocals intelligible and above the rest of the band. The extra-compressed group can keep the overall volume up, while still maintaining some dynamic range and control via the “cleaner” group.
NOTE: Different digital boards and brands have ways of dealing with latency. This technique of using two stereo busses/groups should work in most cases. Your results will vary. As always, use your ears, and mix for the Artist.
Cheers!
-brian