August is House Music Month!

Readers of this blog know how much we at Rocktzar love the odd, esoteric parts of live production – every tutorial even has a section named as such. Our love for Qlab is also pretty obvious. Which is why we are able to share a month’s worth of posts about house music – because there is just so much to write about, especially when talking about Qlab!

This month, we are going to delve deep into how we have built and run house music for Rocktzar shows over the years – what strategies seem to work better than others, why, and how to remain flexible in the face of changing technology.

Here are the topics that we will be posting about in August’s House Music Month:


We also have some previous posts that we reshare on social media that are on this topic:

July was Live Mixing Month! New blog themes are coming

As our blog here on Rocktzar.com grows, we are happy to announce that we will start organizing our content into monthly themes, as appropriate. We don’t foresee every month being thematic, but as we get more content we will try to organize it to make sharing – and learning – more convenient, and help the flow of conversation.

We will also start to interview other people in the industry to get their insights and share their knowledge, as well as some occasional guest blog posts.

Of course, the bulk of our tutorials will still involve a lot of Qlab! Our goal is not just to show you how we do weird and wild things in our favorite show cue system, but to bring it all into context within the larger live production environment.

Here are our posts for July’s Live Mixing Month:

We also had an older post that we reshared on social media on this topic:

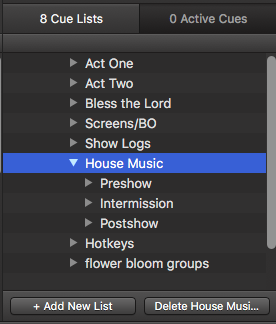
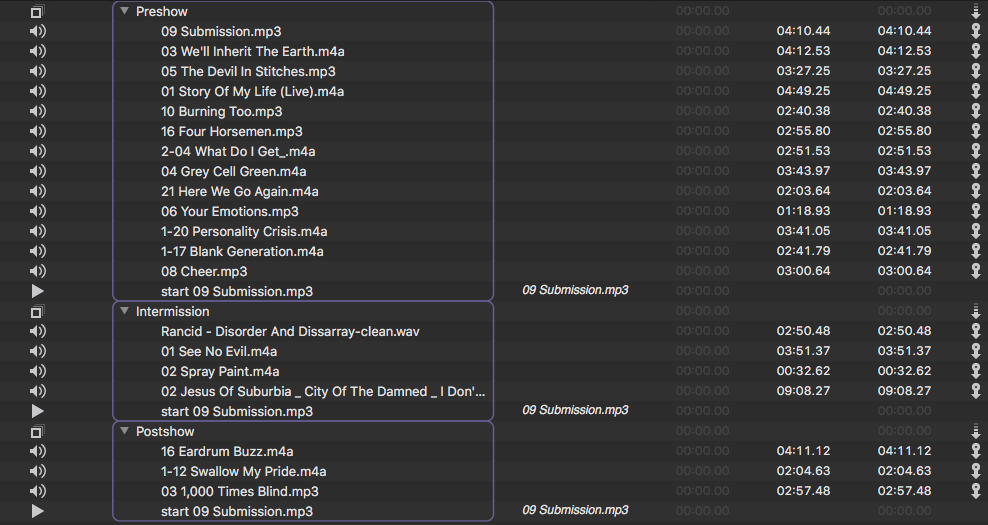
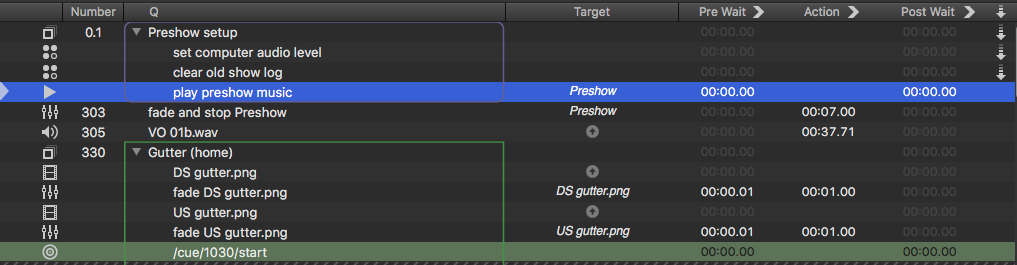
Qlab organization – Multiple Cue Lists and House Music

TL;DR:
Work smarter and cleaner with multiple Cue Lists – re-use your work, and get all of that house music out of your main design.

The Story:
Design is a messy process. There are so many elements to consider and plan, and the brain often jumps about, tackling one part and then another, possibly in a less than linear pattern.

Performances can be tense events, because everything has to work precisely as expected every time; or at least consistently, so that any interpretations that occur – the art of performance – can be supported.

The tendrils of design that an application like Qlab allows and encourages means that we need to provide our operators with a clean, organized workflow. Just as you wouldn’t patch 32 XLR cables into a snake, leaving them tangled and unlabeled, you should also strive to create a Qlab workspace that makes sense to the designer, as well as to the operator should problems arise or changes need to be communicated.

Once a show has entered the later stages of tech, I want to be sure, as a designer, that the show feels like the real thing to the operator and everyone else. That is the point of rehearsals, right?

The Esoteric Bit:
A show programmed in Qlab can end up with a LOT of nested cues, and what I don’t want to leave the operator with is a GO button that then cascades through a dozen groups and interdependent fades, where half of the screen scrolls on its own as the computer completes the cue. (I originally thought that collapsing a group in my Cue List would hide some of the sausage making of my show, but no, often times things expand and make a visual mess.

Let’s take house music, as an easy example. Doors open at 30 minutes before curtain, so you need a bunch of music tracks to play, right? In my opinion, no one needs to see 8 songs in the first cue, which is even before the show starts! It’s unnecessary, it’s cluttered visual input for the operator, and depending on how it is programmed could open you up to errors as changes are made (“There was an autofollow on the last preshow song and the show started accidentally!”)

Cut all of that out. First, on the right-hand side, create a new Cue List and call it House Music.
House music Cue List and Group cues
Select that Cue List, and then create a group called “Preshow.” (You can also create others for Intermission and Postshow.) In your preshow group, add all of your house music. Set the Autofollows as appropriate, so you have a nice preshow playlist (my example is from a punk-rock version of Godspell NVCC did a couple of years ago).
Godspell house music playlists

Back in your main Cue List – which I often call “Act One” or some other obvious name – create a Play cue, which targets the new Preshow group you’ve created – simple as drag and drop, like any other targeting.

Play cue within my “preset the house” Group

Now, at the top of your show, you’ll only have one line, instead of all of those songs! A Fade & Stop cue targeting that group will allow you to fade it out on demand, no matter what song is currently playing.

I also use this multiple Cue List approach when creating soundscapes – talk about not wanting to see all of the sausage making that goes into sound design! The added benefit is that if that soundscape comes up in the show more than once, I can just keep invoking it with play cues, instead of copying the ENTIRE soundscape and all of its nested groups. If I make a change to the soundscape, I only have to fix it in one place, which will update it in every instance.

Triggering a soundscape for the play “Golden Boy”

I am aided by the fact that my soundscapes are almost always semi-complicated, randomly-generated looping beds, so being used more than once or twice doesn’t mean I have to make adjustments to keep them from being monotonous or obviously re-used.

NOTE: Regarding house music – I have gotten into the habit, on more and more shows, to add a Play cue in my preshow playlist, at the end of the group. It targets the first song, to loop back into the playlist. You never know when there might be a hold on the house, and you don’t want to run out of music. I try and curate my house music very carefully, and hate repeats – but even with planning for more music than I need (that might never be heard), it’s a nice safety valve to have. This is useful for intermission as well. In the example above, between the amount of curated music I had and the way the show ran, I used the the top of my preshow as my loop target, which reduced the likelihood that audience members would hear music repeat.

Cheers!
-brian

Parallel Compression in Live Mixing (Compression Part 2)

TL;DR:
Parallel compression is a common studio mixing technique. Why I use it live. Latency and digital mixers.

The Story:
Parallel compression was introduced to me when I was mixing a project in Protools (thanks to Greg Giorgio, the same guy who taught me about versioning (https://www.rocktzar.com/visions-for-your-versions/). For those who need to google that, it’s the awesome process whereby your original channels (like all of your drums) pass not only to the main mix, but also to a subgroup, where they get squashed further by heavier compression – which, as a soloed group, may sound like way too much compression. This subgroup hits the main mix as well, which pushes the overall intensity (of drums, in this instance) of the instrument, but the original channels maintain the character you were after in the recording.

Another part of this, in the studio, is using multiband compression, so that the lows, mids, and highs get their own unique compression settings that are appropriate for the song.

In last week’s post, https://www.rocktzar.com/multiple-compressors-in-live-audio/ I talked about bussing channels together for a second round of compression, which helps unify a section as well as tackle dynamics in a more graceful way. This week, I’d like to approach that from a parallel compression standpoint – and why I sometimes choose that route.

The Esoteric Bit:
Last week we looked at a symphony mix. Let’s look at a rock band, and make some quick routings and groupings. We will use the same assumptions of a mix as we did in the DCA & Groups post: https://www.rocktzar.com/audio-acronyms-dca-vca-groups/. For illustration, let us look at the guitar portion of the mix – 6 channels.

To manage the myriad of tones that guitar players will create, and keep the mix a bit more “together”, it’s often necessary to put a little compression on each channel, just to take a little edge off the top. Individual results of course vary. Once I get all of the guitars sounding good individually, I’m going to send them post-fader to two stereo groups (remember, I’m panning things all over the place to create space and discern parts from each other), and not to the main mix. As described last week, one of those groups is going to have a secondary compression put on it. This is going to be to taste – it might not be as heavy handed as the drum recording example I opened with, but it’s going to dip in and hit most of what’s going on in this group mix. The right settings are going to depend on the type of music.

So now I have a compressed guitar stereo group. Nothing’s going to rise out too much and wreck the balance I have created, via this group. And it’s glueing the section together – I’m creating a pretty solid wall of guitars here. But, taken on it’s own, it might be a little emotionally dull, overly compressed. We want excitement and dynamics. We might want some of that original channel’s sound to be heard in the mix – especially when the guitar solos start happening.

We could – on some boards – send the guitars simultaneously to the group and to the main mix. But there is a problem inherent with digital boards – something called latency.

Latency is basically what happens every time you add a plugin or even routing signal – the computer’s processing adds time, which is very, very short. Tiny milliseconds. But that little bit off can cause problems in your mix – like phasing. And in this example, you have two signals:

  1. The original channel hitting the main mix
  2. The same signal routed into a group, hit with a compressor, and then to the main mix

They may not align, arriving at the main mix at the same time. Without going into a deeper discussion of phasing and comb filtering, you need your signals to match, and the waveforms to be doing the same thing at the same time.

This is where the second stereo group comes into play. In this group, you will ALSO add a compressor. But set the ratio to 1:1. So essentially there is a plugin in the signal chain, but it’s doing a big fat nothing. Now you have two stereo groups, one is affected and the other not. But there are the same number of plugins and the same type of routing, so everything arrives at the main mix at the same time.

The resulting signal flow for parallel compression in a live mix.

When you are mixing guitars during the show, you can boost your soloist, and bring down everyone else. (How you do this – with DCAs or mixing the channels – depends on what works for you and the artist.) Boosting the soloist is just going to hit the compressor a little harder, but that’s ok, because you have your cleaner signal going out as well.

This parallel compression trick is also very useful on vocals. Every engineer is always working hard to keep vocals intelligible and above the rest of the band. The extra-compressed group can keep the overall volume up, while still maintaining some dynamic range and control via the “cleaner” group.

NOTE: Different digital boards and brands have ways of dealing with latency. This technique of using two stereo busses/groups should work in most cases. Your results will vary. As always, use your ears, and mix for the Artist.

Cheers!
-brian

Multiple Compressors in Live Audio (Compression Part 1)

TL;DR:
How to use multiple compressors in a live mix, when your digital desk only has one compression plugin per channel.

The Story:
A lot of starting live engineers work vertically, adding EQ and compression on each channel individually, and then use groups/bussing for mixing and routing control. This is fine, but I often rely on a couple of passes of compression. Additionally, parallel compression is a technique I learned mixing in recording studios, but sometimes I find that it really helps my live work. Here is how I like to compress, and why it works for me. I have found this to work for rock bands as well as close-miked symphonies.

To break this up, I will cover parallel compression next week.

The Esoteric Bit:
Firstly, let me state that my use of multiple compressors live stems from my studio mixing, where you take multiple passes at compression to take the dynamic edges off gradually, rather than in one giant chunk. But, unlike in a DAW where you can add as many plugins as you want to a channel, digital mixing desks only allow you one compression plugin per channel.

Sometimes you have so many mics and sources coming into part of your mix that you have to deal with things a bit ruthlessly, in order to carve out space for everyone to be heard and to make a cohesive experience for the audience. Anyone who has put together a kick drum and a bass guitar knows this. It’s like putting a low cut/high pass filter on a vocal for the first time – some of the richness of that singer soloed just adds mud in the mix, and chopping it out suddenly makes them more discernible against the full band. (Lots of people start carving out at 150Hz, but sometimes I’ll even start hacking away at 200Hz and experiment from there.)

But let’s talk about groups of instruments. I first tried this while mixing a 30 piece orchestra, which for various reasons and decisions needed to be close-miked. But that gave me quite the task of sorting things out, especially once you counted in the fact that feeding into these 20+ channels was a bunch of mics on Y combiners in the original design, which meant EVEN MORE sources, circumventing the limited number of channels I had to work with on a Yamaha DM2K (with a sidecar).

Only 24 channels, but I LOVE this board, for all of the dials at my immediate grasp!

So to make sense of what could have been audio soup, first I made each channel sound the best I could – basic EQ, gating, and MAYBE compression – but with a lot of open mics, I had to be careful. (Too much compression could make my noise floor more apparent.) But then I would take similar things – violins and violas, for instance, pan them around to make some room, and then bus them in a group. From there, my real compression started hitting. By compressing the whole stereo group instead of focusing on the individual channels, I could get them to sound like a section, rather than individuals.

This meant that some players, especially in the horns, were getting compressed twice. The first was a little harder – maybe 3:1 or more, with a shallow knee – to reign in some of the player dynamics, and the second pass was to glue them all together, using a higher knee setting and maybe only a 2:1 ratio. Then I wouldn’t have to chase that section around as much throughout the show.

However, it should be noted that if a horn player took a solo, raising the channel fader for that player would be pushing their post-fader signal into the “Horn” group into the compressor that much more, yielding diminishing returns, after a fashion, as the compressor started to work harder. As with many sections that have a soloist, it is often best to mix by addition (of the soloist) and subtraction (of the other instruments).

Another use for having these two passes of compression is that if you are in the unlucky position of having to mix the monitors from FoH, sometimes having a less-compressed source (i.e. the original channel) can be useful.

Next week I’ll talk about parallel compression for use in live mixing.

Cheers!
-brian

Audio Acronyms: DCA, VCA, Groups, and why the nuances matter

TL;DR:
A look into DCAs and VCAs – seemingly strange and esoteric acronyms – how they can help you mix, and how they differ from groups.

The Story:
As audio mixers got bigger, it made sense to have the controls for outputs, submixes, and other master knobs and faders in the center of the desk. One of the brilliant inventions of the analog era was the VCA – which stood for “Voltage Control Amplifier.”

The way to look at a VCA is as a remote control. It allows you to group faders together, without having to hunt around the board or grow extra hands.

From one of my favorite resources, Soundonsound.com:

“In a large–format analog mixer, a VCA, or Voltage Controlled Amplifier, is a channel gain control that can be adjusted by varying a DC voltage on the control input. This makes it possible to ‘move’ a raft of faders together, maintaining any offsets within them, by moving a single control fader.”

As digital boards came into being, that usability and workflow was desired by engineers, and so the DCA was born. It basically does the same thing, only digitally, not via voltage.

Groups, on the other hand, allow you to bus channels together – which might be for more than just volume control, since you can add effects.

Let’s look at how you might want to use these, and compare them.

The Esoteric Bit:
First off, I’m not going to tell you how to assign DCAs, VCAs, or groups – every board is different. and may have variations in the implications. We will proceed with general terms, with some specific examples. I am also, for this article, using DCA to mean both DCA or VCA – they do the same thing, and DCA is more modern. We will assume you have 8 of them, since that’s a common number. Also, while I use the term “group,” some manufacturers may refer to these as subgroups, mixes, busses, or a number of other terms, which may have their own implications.

First, an easy example. At NVCC, our main stage rep plot is mostly used for the lectures and dance groups that come in. The plot features a pair of podium-mounted mics, three wireless handheld/lav combos, a DI from the board, and a DI from the booth. We also have a bunch of other stuff plugged in – the rest of the wireless rack, a CD player that’s seldom used, etc.

Because of how the channels are set up, the channels we most often use are spread across two pages on our Midas M32. To make mixing easier, I’ve assigned all of these channels to DCAs, so that everything can be mixed with the 8 faders on the DCA page – no flipping back and forth between the podium mics on channels 1 & 2 and the laptop DI coming from the stage on channels 31 & 32.

The DCA assignments look like this:

DCA assignment chart

Just hold the select button on the DCA in question, and press the select button to light up the channels you want controlled by that DCA. Makes things rather easy. Set your levels, and then ride the DCAs to mix.

Now for something more complex. Let’s say you are mixing a rock band. There might be 12 channels of drums, three for bass (DI, effects, & mic), 6 for acoustic and electric guitars, 6 for keys and sampler, and 5 vocals channels – and don’t forget a few effects returns! Your patch sheet would look something like this:

Patch sheet, with sources and channels

(You ARE making patch sheets, right?!)

Depending on the band and your style, you may want to approach organizing and layering your mix in a few different ways, once you have all of your inputs and levels set. Obviously, when you are live mixing something like this you only have so many fingers and want to control fewer faders in mixing. All of the drums may sound great by themselves, but pulling back 12 faders of drums that are too loud in the mix starts to destroy the balance you worked so hard on. Similarly, the vocals are blending nicely, but when the song heats up and you have to boost the lead vocal in the choruses, you don’t want to suddenly leave the backing vocals behind when they come in.

In these cases, grouping your channels together with a DCAs or groups helps alleviate the situation. Putting all of those drums into a group, or controlling them with a DCA, would mean that a single fader would allow you to control the level, instead of 12 faders (discounting that things like overheads and top/bottom snare might be paired).

So which do you use? Here’s where “it depends” comes in. You might want to control your 4 backing vocals on DCA 6, with DCA 7 as your lead vocal (independent control, but next to each other, with the lead first so that you don’t have to quickly find the “center vox” etc. Maybe DCA 2 is for all of those Bass channels. And so on. (It may seem like I skipped straight to random numbers, but I organize my mix similarly throughout the whole board – drums first, then bass, guitars, keys, other stuff, vocals, and effects.)

For those dozen drum channels, you could route them into a stereo group (and not to the main mix) instead of using a DCA. Sure a DCA would work for level control, but here is one of the big differences between groups and DCA control: you can apply effects to a group. Putting a final EQ and Compression on that stereo drum group could help glue those 12 mics together better, for a more cohesive sound. Here you would use a stereo group (or two groups that are paired and linked as stereo), so as to keep the panning of your input channels intact.

A DCA is basically like a remote control – you can’t put effects on it or route it.

From there, you could, on most boards, assign that stereo group to DCA 1 if you wanted, thereby putting your top level of control next to everything else. (See, then Bass is DCA 2…)

Do you REALLY want to have to reach across this desk??

During the show, you could always go back to your channels and pull back the snare top but boost tom 2, because that’s how the drummer is playing. But your overall control setup means you are dealing with fewer faders for the overall mix, and less paging on a digital desk – or reaching, on an analog one.

Back in the analog-only days, groups also made it possible to apply effects more easily – that big outboard rack might have a lot of compressors, but they get used up quickly in an environment like this, or you only have so many channels of a certain kind of compressor. So maybe your kick and snare got dedicated compressors, but the four toms got lumped together into two channels, via a group.

In the digital era, you are only limited by your imagination. You can turn on compression to every single channel, whether it needs it or not. A lot less planning of resources can be involved (see my note below). However, perhaps routing through groups can save you time, using the analog method. Mixing a cattle call show in a club with five bands, you might want a group for guitars, just so you can compress all of them and their myriad of sounds, without dialing in each and every player, during each 15-minute changeover, because you have no idea of what to expect.

NOTE: You should keep in mind that digital mixers ARE computers. We have all seen what happens when we ask our computer to do too many things at once. Things slow down. They aren’t as efficient. So, while in realistic use you probably won’t run into bottlenecks, you might want to not turn on Every. Single. Effect for all your channels if you don’t need them. In some cases, it may just throw an error and say you are out of plugin channels or something like that.

This is also why on bigger systems we often have outboard gear (which can still be digital) handling things like complex routing and effects like system EQ and delay alignment, allowing the mixer to just focus on inputs.

And that’s why NVCC bought this bad boy…because we needed it!

Next week, I am going to go into my own band mixing philosophy, using groups, DCAs, and parallel compression.

Cheers!
-brian

PS: I have come to embrace the digital revolution in mixing. Like it’s studio counterpart, the change in tools has changed how we mix, and ultimately how we listen to and experience music.

But however much I love certain digital mixers for different gigs, I get a rush every time I have to go into a full-analog environment (which is well-maintained). You really have to think about your resources and how the sound is getting from the stage, to the FoH, and back to the stacks.

For you younger engineers who may not have had the luxury of mixing in a proper analog venue, I recommend it. It really gives you a better appreciation of our modern tools, and it’s a lot of fun.

But don’t forget your paper, pens, and extra board tape!

Rock & Roll tours with Qlab (and help from Evernote)

TL;DR:
Qlab is not just a tool for theatre. And it isn’t just for playing back media cues!

The Story:
I have been the North American sound engineer for Pain of Salvation (https://painofsalvation.com) for a few tours. I could go on at length how awesome that job is. One of of the issues we deal with is the fact that the band flies in from Sweden, and there are real budget constraints we have to respect to keep the accountants happy. That means we are limited in the amount of gear we can carry around.

As a result, we rely on the house PA system. I program the show for the sound boards that I will be mixing on using their offline editors. The last tour saw me with 5 or 6 different versions of the show – one for a Yamaha, ones for the Midas M32 and Pro2, Avid…it goes on. And those files were constantly getting edited on the bus as the tour rolled on, as we made changes from night to night. And then there would be the analog boards, where I had to work off my printed notes… All in all, the basic sound engineer stuff. Lots of spreadsheets. The only PA gear we brought was a stage box to feed the in-ears, which had to be patched and split every night. So mixing the show meant prep for the board, and then reading the notes I had made for each song – no scene changes, automations, or other amenities offered by digital consoles.

My point is that, while I was doing the normal work of a sound engineer and production manager, it was still a lot of work, as any touring guy will tell you. We work hard, earn the money, and love the job – and I get to hang out with my friends for a few weeks:

2017 Pain of Salvation touring company

But what if I could make it easier? There is no budget for an assistant, never mind any room on the bus. What if I could automate the little things I did, so that I could do my main job BETTER? Automation of computer tasks is not leading to a world where we get more time on the beach – it’s allowing us to focus on the tasks that matter most. For me, that meant firing up Qlab.

Through this tutorial, I will also show how I used Evernote, an amazing application my wife hooked me onto, as well as Logic, which I was using to record every show – all in one workflow.

The Esoteric Bit:
First off, I needed a kicking playlist, to get the crowd pumped up as our direct supporting act, District 97 (http://district97.net), moved off the stage. That music lived in a secondary Cue List, and was triggered by a play cue, keeping it out of the way and out of sight.

I used this script, featured in an earlier blog post, to figure out how long the music would play and if I needed to add more songs:

https://www.rocktzar.com/long-qlab-playlist/

At soundcheck, I opened Qlab, which could trigger my noise generator, as well as have my reference music ready to play after I tuned the room. I also ran my script to set the laptop volume level, in case I listened to headphones on the bus. At the end of the soundcheck, you’ll see I have a trigger to open the applications I would be using during the show – namely, Logic and Evernote (and bundled in a “Quit ToneGenerator” command for good measure).

My soundcheck Cue List

Showtime.

While our direct support District 97 moved off stage, and the house engineer cleaned up the booth. I hit GO to start the house music on my laptop, and headed through the crowd. I had taken on the role of guitar tech for the tour as well, so the house guy would load my show that was saved at soundcheck as I started bringing out pedals and guitars to the stage, getting things placed and tuned.

The band would be in the dressing room with final prep, listening to my mic checks on their in-ears. They were also working on the setlist, which would be written out in sharpie on paper.

Here is where the whole “automation saves time” comes into play. I’d take a photo of the setlist using Evernote, which, in addition to saving it for posterity, meant it was getting synced over the Internet to my laptop running Evernote. (I could also share this note with the agent back home, who is a fan.) By the time I got back to the board, the setlist was there as an image.

My next GO cue in QLab would run a number of things:

My main Cue List
  1. Send a command to Logic to start recording (I had a USB mic on a stand next to the booth.)
  2. Give focus to Evernote, which resulted in displaying my virtual sharpie on paper, alongside my mixing notes for the songs.
  3. Fade out the house music and pause.
  4. Had I thought about it at the time, I would have also started a timer, so that, combined with a timer at the end of the show when house music resumed, would have told me how long the show ran without looking at a watch and marking the time.

Bam. Instead of rushing through the crowd to get myself situated and remember to hit record, etc, I could arrive at the board clear-minded and ready to mix, and hit that go button. I’d have this view on my laptop screen:

Evernote, preset with two panes side by side, so that the setlist would automatically load as shown.

The one other thing the band and I talked about adding to this cue was triggering the band’s walk on/backing track. But we came up with it on the bus mid-tour, and it was a little too late to sort out the networking involved, even though we had a wireless access point for our stage monitors. The tracks were coming from D2’s keyboard rig, which was running Mainstage. So had we the time, we probably could have made it work, by sending a MIDI or OSC command to his laptop.

Instead, someone had to sneak on stage to hit the button.

At the end of the show, I’d Command+Tab over to Qlab and hit go one more time to start up the music, stop the recording in Logic, and quit Evernote. (I don’t remember why I left the note to myself that I was not saving or quitting Logic with that cue…)

So there you have it. Using a different house system every night is a lot of work. You might not have to load in as much gear, but there is a lot to figure out and set up. While I did use QLab to play back audio cues (house music), most of the work was simply automating my tasks, and providing me a platform to organize those tasks within an environment I would probably need to use anyway (because iTunes just won’t cut it).

Cheers!
-brian

PS – Thanks again to Mic Pool on the Qlab forums (https://groups.google.com/forum/#!forum/qlab) – I wanted to clean up something in my programming, which had been done on the fly on tour, before posting here. I then created an issue with a fade in, and he was able to find my error. He also wrote the script I referenced at the beginning of this post, regarding calculating the length of a set of tracks. Amazing designer. Thanks, Mic!

Let Qlab run other applications with Applescript (with ToneGenerator as example)

TL;DR:
Use Qlab to control every application on your Mac, so you can focus on your show. Also, ToneGenerator is great for soundcheck and room tuning.

The Story:
By now, you know that I am a big fan of using Qlab for everything. Part of that is the unified interface with the shows I work on – it can help reduce the feeling of multiple personality disorder, when you are switching between a sound design one day, video later that afternoon, running a light board the next day, and so on. Because Qlab can run Applescript – which is a simple language that can control all of the macOS (aka OSX) – you don’t have to worry about switching windows or getting confused, or losing “focus” (focus is basically the application that is open and “on top” – the one you are currently in, even if you are multitasking).

So, in the interest of teaching a person to fish, we’re going to look at the details of some of the scripts I have shown in past posts and why they work. You can use even these simple commands in your own work to automate things.

The Esoteric Bit:
I use an app called “Tone Generator” for sound check and room tuning. Does what you expect – generates white noise, pink noise, sine waves, etc. But I don’t want to look for that, even if it’s in the Dock on my Mac. I want to add opening and starting that to other things I do at sound check – maybe launching a video, or clearing up files that were created during the last show run. So, I write a script in Qlab:

Applescript entered into Qlab’s script editor

Let’s look at each line. (Sorry, there are no line numbers in the script editor…that would be great, Figure 53, if you’re reading this… 🙂

tell application “ToneGenerator”

This is simply instructing macOS that we are going to send commands to an application called “ToneGenerator”. Spelling is important. This is the name as it appears in your Applications folder. I have had applications that I kept multiple versions of – in that case, I called them “Name 2” and “Name 3” – denoting the versions. The exact name has to be reflected in this line. Spaces count.

–loads Tone Generator, http://www.nchsoftware.com

This is a comment. Putting two dashes means it is a comment written into the Applescript, and not executable code. You can also put comments on the same line as code – so I could have just as easily put this on the line above.

activate

This is simply having macOS to load the application, which then puts it in the foreground (gives it “focus” – this can be important).

delay 1

Simply adding a delay of one second before transmitting the next line of code to macOS – giving the application time to load. You may find you need to adjust your delays, depending on what you are doing.

tell application “System Events” to key code 49

This line is commanding a part of macOS, called System Events, to type a key on your keyboard for you. That’s right, you can have your computer type for you.

This is a cool part of Applescript. Every key on your keyboard has a corresponding code. Here is a great reference page of all of the codes for your entire keyboard: https://eastmanreference.com/complete-list-of-applescript-key-codes. In this case, I am telling macOS to hit the space bar. Additionally, you can also use the term “keystroke” instead of “key code” – in that case you would just put the name of the key in quotes. But in this example, it doesn’t work as well for the space bar, and so key codes are better. Regardless, System Events does the keyboard work for you. Why am I sending a space bar command to this application? Because that is the Play button in ToneGenerator – my last selected noise will start to play.

end tell

This says to macOS that you are done with your script – you’ve closed up the “tell” command above.

You can mix and match all sorts of commands with Applescript. This is just a basic example of loading the application ToneGenerator and having it start to play back sound.

If you have ever heard of API, or programming hooks, this is basically what we are doing here. (If you haven’t heard of API, skip it for now. It’s ok if some part of your computer is a magic black box…)

Next post I will talk about how I used some of these basic commands with Logic and Evernote at my front of house desk on a rock tour!

Cheers!
-brian

P.S. If you really like working in Applescript and want to know more, there is an easy to use tool called “Automator” that you’ve probably seen on your hard drive. Looks like a little robot:

Automator, your helpful little robot friend.

It provides you with a simple drag and drop interface to program your own lines of code. Give it a try! Then paste the results into your script editor and see how it does in Qlab.

Google Drive and syncing your show with Backup and Sync software

TL;DR:
Sync your computer with the rest of your team when you receive a Google Drive share.

The Story:
As I will cover elsewhere, Google Drive is king of all of the sync services out there – plenty of space for free, everyone has a Google account, and the Apps for word processing, spreadsheets, etc are unparalleled when working collaboratively.

So you’ve received an invite to collaborate with others with a folder – what do you do? How do you best use it? Google Drive allows you to share just an individual file; but for our purposes (sharing with the rest of a show’s crew or design team), we will look at the folder-level of sharing. I am going to assume you already have used the Google Drive part of your account and set it up.

The Esoteric Bit:
So you get an email that looks something like this:

Google Drive email invite

Clicking on the link brings you to the folder in your browser. But where is it located? It is in a section of your Drive account which you may have seen on the left-hand side in your web browser, called “Shared with Me”:

Google Drive - Shared with Me

Right now, you can see what is in the folder. But the best way to be able to add files to that folder and be a full collaborator is to right click on the folder in this “Shared with Me” view, and select “Add to My Drive”. This moves the folder into your “My Drive” – the main area of Google Drive where you tend to do all of your work and have your own files.

Now, anything you do to that folder or add to it will be seen by everyone else on the team.

Next step – getting all of this on your own computer! Yes, you can just work within the browser. However, I find that since working in stage production involves a lot more than just Google spreadsheets – lots of PDFs, Qlab (of course), Vectorworks, etc. I don’t want to worry about uploading the latest version of my work, or downloading three copies of a Photoshop PSD in case someone made a change.

This is where the awkwardly named “Backup and Sync” application comes into play. You can download it at https://www.google.com/drive/download/backup-and-sync/. Install it, choose where you want your Google Drive folder to live on your computer, sign in, and you’ll be allowed to copy everything that is on your GDrive to your desktop. Once you do, any changes made locally will automatically upload in the background (with much quicker speeds than through the browser, BTW).

Let’s set up “Selective Sync” so that you are only copying down from the cloud the files that you need. The screenshots are from my Mac, but PC users will see mostly the same thing. First off, with “Backup and Sync” running, click on the icon (upper right on the menu bar on Mac, lower right system tray icon for PC).

Google Drive Backup and Sync menu

Click the three dots and select “Preferences” from the submenu. You’ll see the following screen:

Google Drive - Selective Sync

Click on “Google Drive – Sync some folders” on the left side and you will see everything in your GDrive. (If you skipped the step above and didn’t add the folder shared with you to your Drive, you won’t see it here.) From this screen, you can select what folders to add. If you only select some subfolders, then you’ll see a dash in the checkbox – in the NVCC example above, for instance, I only wanted to sync our current show and Rep Plots.

Once you hit OK, everything you have selected starts copying down to your computer. It’s pretty fast. From now on, leave this application running in the background and it will keep uploading and downloading all changes.

Some things to know:

  • Not only does this sync your files with your teammates, but you now also have a backup of your show. If I had a critical failure of a show computer during “Love Sick” (example above), there is already a backup copy on the designer’s computer as well as in the cloud (and even on our second show computer). We could be up and running within minutes on a new machine.
  • Have a Google spreadsheet (or doc, etc) in your folder? What gets synced to your hard drive acts like a web shortcut that opens up a browser window with that file.
  • The one annoying thing about this workflow – any file that is NOT in a folder gets synced to your local drive. Have a bunch of files in the top level of your GDrive? Yup, they’re syncing with your computer too. So took the step of cleaning up my drive first (which is why you see some “+Misc” folders in the example above).
  • If you are done working on a project and no longer want the folder on your local computer, but want to leave it in the cloud, just return to the selective sync screen and uncheck the boxes – it will automatically be removed for you.
  • See my “+Design Template” folder above? That’s how I am able to start working on a new show and generate all of my documentation and folders so quickly.

Cheers!
-brian

PS – Yes, this involves your show computer having Internet access, which is frowned upon by many people. For my shows, I’m usually running Qlab, and if the system overhead is an issue, I just automate Google Drive and Wifi access on and off via scripting as part of my normal workflow.

Google Drive and orphaned files

TL;DR:
Clean out your Google Drive of old, orphaned files you didn’t realize you still have – and close up a potential privacy hole.

The Story:
I am working on a longer, detailed article on how I use Google Drive, and how it has transformed how I work on live productions. In researching what might have been a potential bug, I came across another issue that definitely exists: depending on who creates and shares files and how they are deleted, sometimes those files still exist – DESPITE emptying the trash.

Orphaned files are files that exist, but technically do not appear in any directory. They appear in searches of your account, but you can’t find them just by browsing your directory structures.

I don’t know all of the scenarios that can lead to this, but it definitely can happen. I needed a solution to “how do I know if i have files that haven’t fully deleted – how much junk, if any, has accumulated in my Drive without my knowing it?” In researching this, i saw that files I had created years ago on a tour with Hiatus Kaiyote, for instance, as well as ones from Laramie Project only months ago, were all still available in my Drive, and viewable by various people I shared them with, even though they were past their useful life and had been deleted. (Ostensibly, it was also cruft building up on their own Google Drives as well, if only under the “Shared with me” section.”

I’ll cover more about Google Drive in the next article; but, for now, if you are a current user, you’ll want to do the following.

The Esoteric Bit:
Files I had shared and then deleted were still sometimes showing up if I did a search for the file name. I could then delete the file again/completely. That’s great – if you know the file name and know to look for it! Clicking on “Details” for the orphaned file confirmed that it didn’t live in a directory – not even in the root (top) level.

However, you can do a search for ALL such files. Go to https://drive.google.com and enter the following in the search field:

is:unorganized owner:me

Google Drive

This will give you a list of all orphaned files in your Drive. From here, you can delete the files, or move them into a Google Drive folder (and they’d no longer be orphaned). From my findings, it seems to work best if you remove the sharing privileges first and then delete the files.

In my case, I was able to clear up 9 GB worth of trash!! (One of my other accounts, on the other hand, had no orphaned files. So your results may vary.)

NOTE: Of course, in this day and age, it would be courtesy to make sure that people have made copies of and files they want and that anything you throw out really and truly is “trash”. Some people share files indefinitely, and expect you to do the same. The point of this article is to make sure that all of the things you THOUGHT you deleted are actually gone.

Cheers!
-brian