A Dummies’ Guide to Qlab, Part 1
TL;DR:
QLab is for more than just playing back audio and video files – and easy to use.
The Story:
I use QLab for almost all of the live shows I work on these days. Even if it isn’t totally necessary upon first look, it provides for me a unified user interface as I cut across from city to city designing and running different shows and in different departments (lighting, sound, video).
As a designer in the college space, I make sure that my students become well-versed in this multi-tool of an application. My goal as an educator and advisor is to help them grow their critical thinking skills, so that they are empowered to make decisions and be stakeholders in the production.
The Esoteric Bit:
While this is documented in many places elsewhere, a brief run-through of the QLab interface feels required prior to launching into the years-worth of tutorials that I have been writing.
At the time of this writing, I have not switched to version 4, which came out only a couple of months ago. Switching versions in the middle of the season doesn’t seem like the smartest move at the moment! However, much of what I will be covering will extend ahead to version 4, as well as back to version 2. (I’ve seen version 1, and have it on one of our older machines here at NVCC…I don’t even think you can get it to install anymore, so we are completely ignoring that one. 🙂
Open up the program, and you are greeted with the following interface:
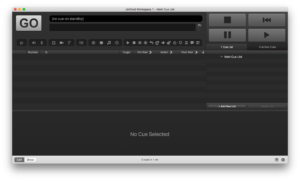
Obviously, the big “GO” button is what fires a cue. It is also triggered by the Space Bar. To the right are a bunch of familiar-looking controls. Honestly, while in tech rehearsals I only use the Pause button, and the Escape key on the keyboard – which is called the Panic Button – to stop all currently running cues and media. (Hitting Escape once will fade everything out in a time that you can set in Settings; default is 3 seconds. Hitting it twice stops everything immediately.)
Jumping down past all of the icons, there are three areas. The first is the Cue List – everything that you program goes here. It happens sequentially, one thing after another. To the right are two tabs – one displays your different Cue Lists (oh yes, you can have more than one!). The other tab is what I leave showing during my run/rehearsal – it shows running times of your Active Cues. It can toggle between elapsed time and time remaining. I only use the time remaining view, because that is much more valuable information to me.
Along the bottom is a large, changing space called the Inspector. Most applications have an area like this. This is where you can get to the details of an element in your design. Command+I will show and hide this area.
At the very bottom right, there are two buttons – one shows and hides the Cuelist/Time Remaining tabs. The other puts you into the show preferences. That’s a deep, deep dive, and we won’t hit that just yet.
![]()
At the very bottom left, there are two buttons labeled “Edit” and “Show”. Edit is what you build your show in, and clicking on Show will basically clean up your workspace, leaving you just with the icons and fields that you need.
Now, what about all of those icons along the top?? Well, many are self explanitory, and I’ll go through the ones I am slated to cover the most in the next few tutorials. They are, in order:
![]()
Group (squares icon) – Think of it sort of like a folder – you can group events together, and manipulate them together. Over the course of the next few months, we are going to cover three of the four kinds of groups – normal groups that really just organize, “play all” groups that fire everything inside of the group simultaneously, and random groups, which will play only one item inside of that group, chosen at random (not nearly as useless as it sounds 🙂
![]()
Audio Playback (speaker) – This creates a cue that will playback an audio file. Same thing happens if you drag and drop an audio file into the Cuelist.
![]()
Mic (mic) – an intriguing feature that lets you control microphones. But only ones that are directly connected to the computer. So…yeah…so far, completely useless to me in the live environment. (Though, as I write this, I can imagine using it during a live Skype call with an audience…I’ve had to hack together plenty of events like that…)
![]()
Video Playback (film strip) – This is just like the Audio Playback cue, only for a video cue. Drag and drop also works to create these. PLEASE NOTE: Qlab refers to all visual playback as “video,” regardless if it is a still image or an actual video file. (We will cover file types in another post.)
![]()
Camera Feed (camera) – much like the Mic cue, this controls only cameras directly connected to the computer. But, this is more of a realistic circumstance, as there are many video capture cards out there that make this feasible to use. In a later post, we will be talking about live camera capture and how you can make your projection designs really come alive!
![]()
Titles (T) – This is an improvement over v2, which didn’t have Titles offered. How many times have you wanted to just put some text up on a screen? Usually you have to use PowerPoint or Keynote for this kind of thing. Now you can create titles directly in Qlab! However, the text handling is not nearly as powerful, and I’m hoping v4 addresses this. Despite this limitation, we will have a few posts about the power of the Titles cue and how it can work for you.
![]()
Fade (mixing console faders) – This cue allows you to apply changes to your cues – from controlling volume, transparency, special effects, size…anything that you want to change in real-time. If you have an animation editing background, sort of think of it like “tweening”.
![]()
OSC (target) – OSC, or Open Sound Control, is a language/protocol that some devices speak and Qlab can communicate in this language. Use this to send commands in this protocol to a specific device on your AV network.
![]()
MIDI – MSC (MIDI plug) – Like OSC, Musical Instrument Digital Interface is a protocol that some gear uses. You’ve probably seen this plug on the back of a keyboard. But it also is available on the back of some lighting boards, audio rack gear, and much more. You can send commands to equipment, other computers, or even software on your computer, to make changes and otherwise control it from within Qlab. This cue is specifically for MSC, or MIDI Show Control, commands.
![]()
MIDI – Music (musical note) – Different from MSC, it is another kind of MIDI, possibly the original format. (More on this later; for now, just trust me it is different.)
![]()
Timecode (stopwatch) – You can sync with other devices and software using Timecode. Don’t worry about this for now, but if you have a video background, you have seen this.
![]()
Play (play button) – Yes, hitting GO will play a cue. But sometimes you want to skip around, or otherwise refer to other cues/items, and target something elsewhere in your show.
![]()
Stop (stop button) – Stops a cue that does not otherwise have a stop command addressed to it. Don’t worry, we’ll get there…
![]()
Pause (pause button) – Pauses a cue. Yes, you have a big pause button on the top. But that’s for rehearsals. To program a pause, and have it only target ONE cue, this is what you’d use.
![]()
Load (circle with a dot) – Think of it as pre-loading a cue. This one is a rabbit hole, but it has helped me fix issues where system overhead was an issue.
![]()
Reset (curved arrow) – Don’t worry for now. Getting esoteric here…
![]()
Devamp (circular arrow) – If something is looping, devamp stops the loop, once it has reached the end of the pass it is currently playing.
![]()
![]()
![]()
![]()
GoTo (arrow), Target (bulls eye), Arm & Disarm (Power On & Off) – We are really getting into the weeds here on our first post. Skipping for now. But, like Target and Load, they will become self explanatory when we get there.
![]()
Wait (hourglass) – sometimes you need to put a specific length pause into your programming. Another “trust me, we’ll get there” feature.
![]()
Memo (speech bubble) – A bit under-utilized, you can leave notes for the person running the show here.
![]()
Applescript (four dots) – I don’t understand why this icon looks the way it does, v2 had a little script icon, but I digress… This is where you can program in Applescript, a very powerful programming language that can control every aspect of the OSX operating system. We will be spending a LOT of time on this one over the coming year. Technically, I believe you can use other languages in this cue as well.
Want more information about the Qlab interface? Figure53, the makers of Qlab, have a great manual, located here: https://figure53.com/docs/qlab/v3/general/getting-started/
Cheers!
-brian